Showing posts with label Seasonal. Show all posts

December 30, 2010

A Traditional Hungarian Dinner


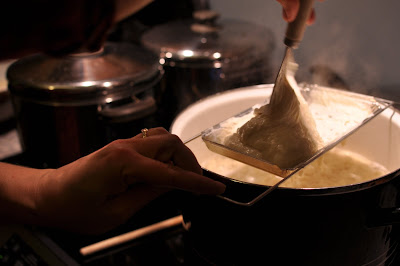
Christmas celebration #4 this year was at my Uncle Andrew and Aunt Julie's place. Julie made nokedli, and she let me photograph her in front of the blazing (only a minor exaggeration) stove while she cooked for our family and friends.


Nokedli is a hungarian dumpling dish that was, this evening, served with a beef sauce or pork sauerkraut. It begins as dough:


which is "grated" using a traditional hungarian cooking tool, over a large pot of boiling water until it cooks.


Served with a delicious cucumber salad, pickles, and bread, it was a delicious meal!


When asked her favourite food, my cousin Emma proudly answered, "nokedli!" That's the Hungarian in her coming out. Here we are enjoying the festivities:


I love Christmas--Canadian or Hungarian style.

October 14, 2010

Ginger Cookies


My house currently smells like the pioneer village I went to on a field trip as a kid. We toured an old-style living quarters and school house, learned how on earth the pioneers did it all, and munched on ginger cookies followed by hot apple cider. You really get the false impression that living as a pioneer was easy.

(I mean they didn't have these!)


And also that they ate a lot of ginger cookies.

It's probably not true, but for the sake of this post we can pretend that they did! I did/am currently doing the same.

Nomm, nom nom.

Ingredients:

2 1/2 c whole wheat pastry flour
2 tsp baking soda
1 egg
3/4 c oil (something of a light variety like canola walnut or sunflower)
1/4 c molasses
1/4 c real maple syrup
1/2 c sucanant or maple sugar
1 tsp ginger
1/2 tsp cinnamon
1/4 tsp ground cloves
1/4 tsp salt
1/2 tsp cardamon

Directions:

1. Mix dry ingredients and set aside.

2. In a mixer or by hand, combine wet ingredients until well combined. Slowly stir in dry ingredients and you will have a moist cookie dough.

3. Let dough sit in the fridge for 20-30 minutes to firm up.

4. Roll the dough into teaspoon size balls, roll in maple sugar if you wish, and slightly flatten. Place on a cookie tray.

5. Bake @ 350 for 8-10 minutes. Enjoy with a tall glass of milk!

Source: mycharmingkids.net

October 22, 2009

Cranberry Sauce: On a Whim


I don't really know why in particular I decided to make cranberry sauce.

It could have been Martha's latest Living magazine, with its awe inspiring photos. This month she made a cranberry compote that was served on mascarpone cheese and cookies.

It could have also been the fact that I have been dying to make a cranberry brie omlete some morning for breakfast.

It could have been because the last time I went for groceries, I was enamored with this gorgeous, fiercely coloured fruit.

All I do know, is that last night I got home from work at 10pm and decided to make cranberry sauce. I also decided that I would not look up the recipe, and that I would make it up as I went. Turns out, I know how to make cranberry sauce.

My version is not as sweet as the Thanksgiving/Christmas version, which I like. It has a bit of a tang, and you you could eat it straight if you really wanted to. Last night, I really wanted to.

Brilliantly red berries, sugar, cinnamon, and lime juice simmered until I felt the time was right make-up this sauce that I made on a whim.

whimy-whim whim-whim,

whim!

Ingredients:

(Makes 1 cup prepared sauce)

I'm sorry that these amounts are kind of vague. I sort of threw things into the pot and discovered, it is hard to mess up cranberry sauce! That should encourage you:)

3/4 of a bag of fresh or frozen cranberries
4-5 Tbsp white sugar (add additional sugar to taste)
few good shakes of cinnamon
1/4 cup water
the juice from 1 lime

Directions:

1. Place all ingredients into a pot to simmer over medium heat. Allow it to come to a light simmer for at least 5 minutes, stirring occasionally. Watch out because the cranberries have a tendency to pop open!

2. When the cranberries have simmered down and take on the consistency you like, it's done! (It will thicken slightly after you let it cool.)

October 13, 2009

Apple Gingerbread Sweet Potatoes


This recipe brings warmth to any meal. I bring it forth as a nomination for the category of "yummy creative side dish made in under 30 minutes", in the food Oscars. Do they have those? They should.

The combination of smooth and creamy sweet potatoes, gingerbread tea which can be cooked directly into the potato, honey, tart and crunchy apples, topped with nuts, dried fruit, and sugar, makes for a satisfying side dish.

I might add that I made these potatoes right after class and in-between homework sessions, so they are pretty easy if you have the right ingredients in your pantry. I literally kept throwing matching flavors into this dish because sweet potatoes are a very versatile vegetable. Sweet, but not too much, so you can add a seasonal flare to them like I did here. Crumbled up gingerbread cookies on top would be a nice addition as well.

You can use any type of gingerbread or cinnamon tea to infuse the potatoes that you can find. I bought mine at the grocery store and have had it sitting around for 2 years, and thought, It's about time to put this tea to some use! So I did. When the water with the potatoes in it comes to a boil, I let one of these seasonal tea bags and 3 black peppercorns steep for about 2 minutes, and the potatoes took on a great flavor!


You can use this same trick when making potato salad. Put a few garlic cloves in the water while the potatoes cook, and they will taste like garlic!

Combine some fresh apples into the cooked and mashed potatoes, cinnamon, and honey or brown sugar.


I didn't cook mine for too long because I didn't want the nuts to potentially burn, but you could leave yours in longer if you left the nuts off until a bit later into the cooking process. Maybe your sugar will caramelize more than mine did.

Ingredients:

(For one portion)

1 medium size sweet potato, peeled and chopped into 1'' pieces
1 gingerbread tea bag (or chai/cinnamon/etc.)
3 black peppercorns
1/2 medium size apple, chopped (I used an Empire apple)
1 tsp. butter (optional)
1 tsp. honey or brown sugar
1/4 tsp. cinnamon
a few pinches of large crystal sugar (like turbanado)
a handful of mixed nuts/dried fruit

Directions:

1. Cook peeled and cut potatoes into a pot full of cold water on high. When water comes to a boil, place tea bag and peppercorns into the pot (steep for 2 minutes) and allow the potatoes to cook another 8 minutes, or until the potatoes are tender enough to be be cut with a fork. Drain.

2. Mash potatoes, cinnamon, honey, and butter in a bowl with a fork until smooth. Stir chopped apples in gently.

3. Spoon mixture into a oven safe dish, and top with mixed nuts/fruit and sugar of choice.

4. Cook on broil for approx. 5 minutes. (You can cook it longer if you want the sugar to melt further, but watch so that it doesn't burn.)

October 11, 2009

Elephant Ear Ice Cream


I bet you have, (if never indulged), at least smelled this delicious treat at a fair or two. I know my nose has led me many a time, right over to the large bus on wheels which deep fries dough to perfection, and tops it with way too much sugar/cinnamon/chocolate/whip cream/fruit/or all of the above.

The 'Elephant Ear' is a classic.

But before you start searching for the closest carnival, I will let you in on a little secret. The delicious sweet flavor of the 'Elephant Ear' is closer than you think! In fact, you can re-create it your kitchen using only 4 ingredients, and no deep frier! My best friend Leah has re-created it in ice cream form.


Now I don't exaggerate, this stuff tastes like the real thing! (Especially the variety topped with cinnamon and sugar.) I'll admit the temperature and texture are slightly different, but it makes no difference in getting across a serious 'Elephant Ear' flavor! And you will never guess what's in it.


Good thing I'm going to tell you!

Your Welcome.

Ingredients:

For one serving.

2 large scoops of vanilla ice cream/frozen yogurt
1 tsp. real cocoa
1/8 tsp. cinnamon
1/2 tsp. large crystal sugar, like turbanado (If you don't have a larger suga
r variety you can leave out this ingredient and it will still taste the same--it's used for texture)

You can top the finished ice cream with fruit or extra 'Elephant Ear' toppings if you wish:)

Directions:

1. Scoop ice cream into a bowl and allow to sit for a minute or two to soften.

2. Sprinkle with cocoa, cinnamon, sugar, and stir. Combine all ingredients well, or at least until the dry powdery cocoa is combined. It can be slightly marbled in colour OR you can combine it completely until it it is one solid colour.

3. Serve into a new bowl if desired.

Enjoy!

Elephant Ear photo courtesy of http://farm2.static.flickr.com/1020/
1332875893_21a32e0a25.jpg

October 5, 2009

Orchard Fruit

An apple a day keeps the doctor away, right?

Well here are two pictures of apples...will that do?


Alllrighty then!

---------------------------------------


In case you were wondering, I'm currently shooting with a Sony HD video camcorder. Just until I get my new Nikon 50mm f/1.4 lens, then I'll be back in business!

But the video camera isn't half bad! Wouldn't you say?

October 4, 2009

Baby Pun'kins and Mulled Cider

I went to the market today after church and bought these baby pumpkins (affectionately dubbed pun'kins):


Kinda inspired by the adorable pun'kins I taught in Sunday school this morning:)
"Okay Max, it's Jehova and YAH-way, not Jehova and HIGH-way. Nice try though."
So in the spirit of the fall weather and all that it brings (adorable pun'kins of all varieties), I did not hesitate in making my room even more 'fall-ish.'

See?


Okay. Okay.
So it probably doesn't look 'fall-ish' at all. But I'm workin' on it! Next project is a fall leaf collage. I'm thinking that once the leaves are nice and colourful, I will find a few pretty ones (not too difficult) and then dry them out in one of my over sized textbooks. (I knew those things would come in handy one day!) Then, once the leaves have fully dried out, you can make a collage with them! On a canvas, on a poster, which ever.

And to go along with this crafty endeavor, a hot glass of mulled cider should do the trick. Here is my recipe:

Julia's Mulled Apple Cider

Hot and spicy, this mulled cider will have you craving more all season long. Bring a thermos-full to work and share it with your friends. Or package up the spice mix in small baggies to give as gifts (for any occasion) with instructions on how to make it.

Ingredients:

Amounts can change depending on how much you are making, but I would suggest making a large batch, and cooling it in the fridge for later; rather than having to make each glass separately.

1 qt apple cider
1 cinnamon stick
20 whole black peppercorns
3 cloves
2 Tbsp. brown sugar
the zest from 1/2 of a lemon, or orange or from 3/4 of a lime
5-6 thin slices of fresh lemon or orange or lime

1 crock pot/slow cooker (if available)

Directions:

1. Place cinnamon, peppercorns and cloves into a saute pan at a low heat, just until you start to smell the aromas. This bring out the essential oils in each.

2. Plug in crock pot and set to a medium heat. I like to use a crock pot because I can heat things and walk away; the stove is not so forgiving.

3. Pour apple cider, spices, and sugar into the crock pot and stir gently.

4. 5 minutes later stir in the zest. Place lid on the crock pot and allow to simmer for at least 30 minutes. 25 minutes before serving, stir in fruit slices.

5. Pick out the cloves and peppercorns or strain the HOT apple cider in a fine mesh strainer but be very careful if you choose that method.

6. Serve in mugs with the cooked fruit slices and cinnamon sticks for garnish. Would also be nice with whip cream and a caramel drizzle.

Now, excuse me while I go 'mull' over my homework. A task that has not been attempted yet this evening. It's not my fault that I'd rather be making crafts and cider than reading 200 page articles ;)

September 26, 2009

Fall 'To Cook' List

Good Morning, eh?

It's a beautiful Canadian morning in Toronto, Ontario; about 17 degrees Celsius and partly cloudy.

For those of you who don't live in a northern climate, you may not realize (whisper:) but as we speak, little leaves on the trees are changing colour from green, to red/yellow/orange. It is indeed remarkable that their natural instinct is to die so beautifully. What a sight!


Did I sound like I was on National Geographic?

Allllrighty then.

In the spirit of these dipping temperatures (that hopefully will not go too low any time soon), I am organizing a Fall 'To Do' list. Or rather a 'To Cook' list.

Stick with me this fall and together we can learn all about fall food, fall table settings, what Martha Stewart has to say about these colourful leaves, and so on and so fourth.

So lets get rolling, shall we?

Basically, my list is comprised of dishes that I want to try, ingredients I want to cook with, and some activities I want to do while the weather is still crisp. (For those of you who don't get snow, and don't have to drive through six inches of it on your way to work, cris
p means: cool, fresh, and invigorating.)

As I go, all of the recipes I have completed can be found in the category, 'seasonal' in the left hand column of my blog.
  1. Apple Pie
  2. Apple picking:
  3. Make Pumpkin Pie
  4. Use Squash
  5. Make a fall centerpiece
  6. Use Terbinado sugar
  7. Have a Fall Photo Shoot
  8. Try Spicy Macaroni and Cheese
  9. Go shopping at the farmers market for some new ingredients
  10. Use Cinnamon in as much as possible
  11. Try Warm and Nutty Cinnamon Quinoa
  12. Have a campfire
  13. Buy and Carve a pumpkin
  14. Try Pumpkin Waffles with Maple Walnut Apples
  15. Use Crepes
  16. Do Wine Sampling
  17. Make Soup
  18. Use Cayenne Pepper
  19. Sew something
  20. Try Curried Apple Cous Cous
  21. Drink Hot Apple Cider/ Mull Cider
  22. Invent a new fall recipie
  23. Blog
  24. Read Martha Stewart's Living Magazine and make something from it
  25. Shop at Pottery Barn
  26. Try Maple Syrup Scones
  27. Try Nut and Seed Biscotti
What are you doing this fall?

September 25, 2009

Today is the Day

Today is the day, I have decided, to relax and stop worrying.

To breathe in the fresh air, and not think about what toxins may be in it; to eat a cookie and not think about the calories; to shop and not worry about the debt; to smile and not feel awkward.

Today is the day to be utterly thankful.

Today is the day to be spontaneous.

Today is the day to be unapologeticly in love with my Lord and Savior. Because I am.

Today is the day to be really happy about being single; to be fearless while heading into the unknown.

Today is Friday, a day of completion.

Today is the day.

Today, try this recipe that I have been meaning to try for the past while. I feel like it will satisfy your craving for 'fall food.'
Cheers.


Roasted Corn Pudding in Acorn Squash

courtesy of 101 Cookbooks

Ingredients:

1 small (2 lb.) acorn squash, cut in half lengthwise and seeded
1 tablespoon clarified butter or olive oil
1 cup milk
1 egg plus 2 egg whites
1/2 cup fresh corn kernels (or more if you like)
1/4 teaspoon anise seed, chopped
1/2 cup chopped scallions
a tiny pinch of freshly grated nutmeg
1/4 teaspoon fine grain sea salt
1/3 cup grated white cheddar cheese

Directions:

1. Preheat the oven to 375F degrees with a rack in the middle.

2. Rub the orange flesh of the squash with the butter/oil. Place cut side up on a baking sheet. You will want it to sit flat (and not tip), if you are having trouble just level out the bottom using a knife. If the squash is tilting on the pan, the filling will run out - bad news. Cover the squash with foil and bake for 40 minutes or until the squash starts to get tender.

3. In a bowl combine the milk, eggs, corn, anise seed, half of the scallions, nutmeg, and salt. Fill each of the squash bowls 3/4 full (see head notes about using leftovers). Carefully transfer the squash back to the oven without spilling (tricky!). Continue baking uncovered for another 30 - 50 minutes, or until the squash is fully cooked through, and the pudding has set. The amount of time it takes can vary wildly depending on the squash and oven. At the last minute sprinkle with cheese and finish with a flash under the broiler to brown the cheese. Keep and eye on things, you can go from melted cheese to burnt and inedible in a flash. Serve hot sprinkled with the remaining scallions.

Serves 4 - 6.

Photo courtesy of http://www.swedishhill.com/image/fall-leaves.jpg

May 3, 2009

My First Attempt at a French Onion Soup


This recipe I have to admit, is not one that I conceived out of thin air--I found it on Laura Calder (a Food Network Chef)'s page on foodtv.ca. Brilliant website by the way! If you have never ventured into the Food Network World, you must.

I have been wanting to make it since the winter but despite its simple recipie, it calls for a few ingredients that I have had to slowly aquire: cognac, and red wine. I don't usually have any alcohol my kitchen other than white wine so recipies like this one get pushed to the back burner.

One day a few weeks ago, my room mate Natalia announced that she had a bottle of cognac stowed away in the back of her room and she generously donated it to my food endeavors! Its a brilliant bottle that looks like something a pirate or retired professor would drink. (I think so anyway). So that was one ingredient down, and the red wine was the only missing element. Luckily my best friend Leah came up for a weekend and absolutly FORCED me to get a bottle of Jackson Triggs red wine. (Complete lie...It was my idea- I felt it would be classy to also invest in some stemless wine glasses!) Safe to say I had it in the back of my head the entire time that the remaining wine was getting chucked into the soup. And that is exactly what happened.


But after all of that, I ended up using only 1 Tbsp. of cognac, and 1/2 Cup of Red Wine. It was worth it.

The soup was simple, but really yummy. Definitely would make a great winter afternoon dish.

Ingredients:

3/4 pounds onions, very thinly sliced
2 Tbsp. butter
1 Tbsp. cognac
1/2 cup red wine
3 cups beef stock
Salt and Pepper
Some crusty bread
Grated gruyere cheese, for garnish

Directions:
1. Melt the butter in a soup pot and saute the onions until very soft, at least 15 minutes.

2. Add the cognac and red wine and wait one minute.

3. Add the stock. Simmer, covered, for 45 minutes. Check the seasonings.

4. Ladle the soup into oven proof bowls and set on a baking sheet. Top each with a slice of crusty bread and sprinkle the top generously with cheese. Broil until the top is lightly brown.