Showing posts with label Sweet Treats. Show all posts

October 14, 2010

Ginger Cookies


My house currently smells like the pioneer village I went to on a field trip as a kid. We toured an old-style living quarters and school house, learned how on earth the pioneers did it all, and munched on ginger cookies followed by hot apple cider. You really get the false impression that living as a pioneer was easy.

(I mean they didn't have these!)


And also that they ate a lot of ginger cookies.

It's probably not true, but for the sake of this post we can pretend that they did! I did/am currently doing the same.

Nomm, nom nom.

Ingredients:

2 1/2 c whole wheat pastry flour
2 tsp baking soda
1 egg
3/4 c oil (something of a light variety like canola walnut or sunflower)
1/4 c molasses
1/4 c real maple syrup
1/2 c sucanant or maple sugar
1 tsp ginger
1/2 tsp cinnamon
1/4 tsp ground cloves
1/4 tsp salt
1/2 tsp cardamon

Directions:

1. Mix dry ingredients and set aside.

2. In a mixer or by hand, combine wet ingredients until well combined. Slowly stir in dry ingredients and you will have a moist cookie dough.

3. Let dough sit in the fridge for 20-30 minutes to firm up.

4. Roll the dough into teaspoon size balls, roll in maple sugar if you wish, and slightly flatten. Place on a cookie tray.

5. Bake @ 350 for 8-10 minutes. Enjoy with a tall glass of milk!

Source: mycharmingkids.net

September 27, 2010

Purple Smoothie


She is a beauty, i'd say! Speckaly (no, it's not a word) and yummy. Nom nom nom. And of course I had to take a picture because we had these beautiful flowers which my dad gave to my mum for their anniversary conveniently placed behind my shot.

And because I really like purple! My room is purple, don't cha know.

What's in it you ask? Well...a little bit of this and a little bit of that!

More precisely? Blueberries, blackberries, milk, acai/pomegranate V8 juice, a banana, oat bran, and flax seed.

Yay purple!

July 13, 2010

Breakfast Blintz


There is a part of my childhood which I remember quite fondly. It would not surprise many to hear that it had to do with food. Food that I ate and thoroughly enjoyed as a kid still sticks with me, and to this day I can recall their textures and tastes. This can sometimes be unfortunate, as some of the restaurants which I really enjoyed are now closed or under different ownership, and no longer making the same food.

Alas, now I find myself trying to re-create many of my favourite dishes from my past. Like this breakfast blintz for example.


The year was 1998 and my family and I dined at a local jewish diner called Katzan-jammers. My mom loved the raspberry blintzes, but I thought they seemed too strange to eat. Eventually however I got a taste in (while making my parents and sister close their eyes), and exclaimed, "Mmmmmm!!! Soo goooood." I ordered the blintz every time we visited after that point. My only lament was that there were only 3 on my plate.

This morning I had a hankering for the soft, and delicious crepes filled with sweet cheese which are topped with fruit and icing sugar. Yes, my hankerings are that specific. So, the BF and I ventured into blintz territory, only to discover that they are quite simple to make!


They make a beautiful breakfast/brunch dish, or evening treat.

And before the formal instructions, here are some photo guidelines:

Ingredients:

Crepes:
1 c flour
2 Tbsp + 1tsp white sugar
1/2 tsp vanilla extract
1/2 tsp salt
3 eggs
1 1/4 cups milk
1 Tbsp vegetable oil

butter for the pan

Sweet cheese filling:
4 oz cream cheese
1 1/2 c ricotta cheese
1 egg
3 Tbsp powdered sugar
1 Tbsp orange zest (you can also use lemon if you prefer)

Fruit sauce:
1/4 c strawberry jam (I used strawberry but you can use whichever flavor you prefer)
1 Tbsp water

parchment paper
some extra powdered sugar
fresh fruit

Directions:

1. Mix crepe ingredients together. FYI the batter will be quite liquidy, so don't worry that you messed anything up. Allow to sit in the fridge for 30 minutes. Meanwhile mix together the sweet cheese filling!

2. For each crepe I used about 1/4 cup of the batter on a buttered crepe pan (or frying pan). Allow the crepes to cook for about a minute on one side, or until they seem "done," and flip for a few moments longer. Your will get better at this as you go!

2. When you have a whole stack of crepes you can begin to fill them. See photos above OR for an easy to follow video on how to fold your crepes, click here.

3. Place into a baking dish over parchment paper and cook @ 400 for approx 10 minutes.

4. While baking, mix the jam with a little bit of water in a sauce pan or in the microwave for approx. 25 seconds, or until soft and warm.

5. For your final presentation, spoon a dollop of fruit sauce onto a plate, followed by 3 baked crepes, a sprinkling of icing sugar, and some fresh fruit.

June 12, 2010

Boyfriend Banana Bread

This is my boy:
And this, is his banana bread:

My boyfriend likes banana bread.

No, I don't think you understand. I mean he really, really likes banana bread. To the point that he would probably eat an entire loaf if left unattended. Which is why absolutely must join him in eating it:)

Where oh where my dear did you learn of your love of banana bread? You may not even recall. I however most certainly recall when I learned of your love for banana bread. It was approximately 3 months ago, when we spotted some spotty bananas on a counter top. I was, naturally, outraged at their state. Ew. (I do not like brown bananas). You however were swooning. So I did what any normal brown banana hating person would do...I made bread with it.

And I believe the rest is history. Along with that loaf and many others after it.

The secret to this recipe is one very strange ingredient: Miracle Whip. You can ditch the shortening and replace it with miracle whip ladies and gentlemen, because it makes this bread moist and yummy!

I was iffy before we tried it but I will now endorse it, for what it's worth. And my BF? I'd say he would endorse it too. (If eating it really quickly is a sign of approval anyway).

Ingredients:
1 egg
1 1/3 c mashed fully ripe bananas (about 3)
1/2 c Miracle Whip dressing
1 1/2 c flour
1 c sugar
1/2 c chopped walnuts (optional) and/or chocolate chips
1 tsp baking soda
1/2 tsp salt

Directions:
1. Heat oven to 350 F

2. Beak egg, bananas and dressing in a large bowl with whisk until well blended. Mix remaining ingredients in separate bowl. Add to banana mixture; stir just until moistened.

3. Pour into greased 9x5-inch loaf pan.

4. Bake 1 hour or until toothpick inserted in centre comes out clean. Cool in pan 10 minutes.; remove from pan to wire rack. Cool completely. Or you know, eat it warm:)

June 11, 2010

Chocolate Dipped Strawberries


Is there a better way to enjoy a kitchen full of strawberries, than to dunk most of them into melted chocolate? I think not.

They are elegant, sweet, photo friendly...see?


And they are so easy to make it's ridiculous. Literally just melted a good handful of chocolate chips and poured in a dab of cream to smooth it out. Then kept them in the fridge to harden up slightly.


If you have any extra berries lying around, try making these for desert! They will be quick to prepare and you can enjoy the excited faces of your family members as you pull them out of the fridge. We don't have desert too often around my place but whenever I can, I really like to make something small.

We really liked these...

I think I ate 5.


December 8, 2009

Peanut Butter Banana Chocolate Chip JiP Cake!

Are you drooling yet? I still am!
So, today, I got an SOS text: We have rotten bananas- please help!


So, naturally, I grabbed my trusty recipe book, which FAILED ME. There were NO recipes for Banana Bread! What kind of recipe book doesn't have banana bread I ask you!?


Luckily, my friend JP (JiP) had a brilliant and easily modifiable recipe for chocolate chip cookie bars! And not only did they take no time to assemble, but they only took 7 minutes to cook.... IN THE MICROWAVE! That's right, we didn't even need an oven to make this delectable cake! So if you have 15 minutes, and some rotten bananas, I have the perfect thing for you...


Peanut Butter Banana Chocolate Chip JiP Cake
Makes 32

What You'll Need:
Banana Chocolate JiP Cake:
1/2 cup butter softened
3 over ripe bananas
1 1/2 cup brown sugar
2 eggs
1 tbsp milk
2 tsp vanilla
2 1/2 cups all purpose flour
1 tsp baking powder
1/4 tsp salt
2 cups chocolate chips


Peanut Butter Icing:
1 cup Icing Sugar
1/4 cup all purpose flour
2 tbsp smooth peanut butter
2 tbsp warm milk

1. In a large bowl, mash 3 over ripe bananas until smoothish (depending on weather or not you want chunks of bananas in your cake!)

2. Add softened butter to banana mixture and mix until well combined. Add brown sugar and mix until creamed.

3. Beat eggs into mixture and add milk and vanilla

4. In a separate bowl, combine flour, baking powder, and salt. Add to wet mixture. Mix until just combined. Add Chocolate chips.

5. Pour into two 8x8 glass pans. Microwave on high for 7 minutes. Let the cake cool in the pan.

Meanwhile...


6. While your cookie bars are in the microwave, get started on your icing! Mix icing sugar and flour together. Cream peanut butter into icing sugar, and slowly add the warm milk. Mix until smooth. The icing should have a thick consistency that is easy to spread.

7. Once cool, ice the brownies and cut them into 16 pieces.

Enjoy with a cool glass of milk and a sweet Sufjan Stevens Christmas Song!


**TIP TIP TIP!!**
If you toss your chocolate chips in 1 tsp of flour before you mix them into the dough, they won't sink to the bottom while baking!


Caution: Eat fast- they tend to disappear quickly!

November 8, 2009

Mocha Chocolate Chip Brownies

So, let me paint a picture for you. I was wearing a bright flower dress, wearing an apron, baking my Chewy Chocolate Chip Cookie Squares, looking very Stepford Wife-ish... but I was dancing like a fool around my kitchen blaring the new Michael Buble CD, because I think the magical ingredient to some of the best cooking is dance... or love, or joy, or something like that. Anyways, the big secret ingredient to my Mocha Chocolate Chip Brownies isn't dance, or love, or joy, but...

**drum roll please**

Starbucks Via Ready Brew!

Yeah, you know the stuff. Every time you've gone in a Starbucks in the past month, you've been harassed by belligerent baristas to buy it. You can't turn on the T.V. without seeing an avant garde, yet accessible commercial about it. And granted, when you tried it in the store it probably tasted like dirty hot dog water, but it is one of the most useful baking ingredients to make a plain old batch of brownies into Mocha Chocolate Chip Brownies!

Pictured above: Chewy Chocolate Chip Cookies and Mocha Chocolate Chip Brownies

Starbucks Via Ready Brew is %100 natural micro-ground coffee, so unlike other instant coffee's, you're not putting coffee flavored chemicals into your body. And while I'm a total coffee snob, and think that VIA will never taste like real coffee, (my mouth is watering at the thought of making a batch of Christmas Blend tomorrow morning for breakfast!) it tastes about a million times better than any other brand out there! The other thing I like about it is that it is so finely ground that it won't add any weird kind of texture to the batter.
Don't worry, if you don't like coffee, you cant omit it! I just like coffee with my... you know... oxygen, so it seemed like the perfect chance to mix it with my other passion: chocolate! I find that adding one pack of VIA doesn't really add TOO much of an offensive coffee flavor, but it does add a really nice depth to the chocolate in the brownies.

Mocha Chocolate Chip Brownies
Makes 16

What you'll need:
1/4 cup margarine or butter, melted
1 1/4 cups sugar
1 large egg
2 large egg whites
1 packet of Starbucks Via Ready Brew
1 tsp. vanilla
1 cup flour
1/2 cup cocoa
1/4 tsp. baking powder
1/4 tsp. salt
1/2 cup chocolate chips


1. PREHEAT OVEN TO 350 DEGREES- In a large bowl, mix together melted margarine or butter, and sugar until well combines. Add egg, egg whites, vanilla and coffee and stir until throughly blended and smooth.

2. In a medium bowl, combine flour, cocoa, baking bowder and salt. Add to the egg mixture and stir just until combined. (Remember, JUST until combined! You don't want tough brownies!)

3. Add chocolate chips.

4. Spray an 8" x 8" pan with nonstick spray. Bake for 30-35 minutes, until edges begin to pull away from the sides of the pan, but center is slightly soft. Cool in the pan on a wire rack, and after about 10 minutes, you'll be able to treat yourself to warm, dark, chocolaty brownies!

These brownies pair well with a GIANT cup of coffee, guitars, and sweet action/adventure movies. Enjoy!


**TIP**TIP**Hey! I have two tips for you this time!** TIP** TIP**
1. If you sift your cocoa into the flour mixture, you have a better chance of hitting that nice soft, dense, chewy brownie texture we're aiming for!
2. If you toss your chocolate chips with a little bit of flour, just so their coated, and THEN mix it into the rest of your dough, they won't sink to the bottom of your brownies! This also works with loaf recipes if you want to add dried fruit or nuts to it!


Next from leah michelle: a fast, healthy breakfast idea that's guaranteed to keep you full until lunch: Mighty Morning Muesli!

Chewy Chocolate Chip Cookie Squares

Try saying THAT five times fast! I thought the best way to start my first real recipe post was with an alliteration, so I hope that grabbed your attention. If not, I'm sure the mouth watering succulence of these warm Chewy Chocolate Chip Cookie Squares will!


Heres the thing, I get in these moods, and I can't sit still. But I can't just go for a walk, or clean or something, I need to create. So I'll bake two or three batches of cookies, brownies, muffins, scones or squares, and then make my friends eat them! I also think I have a complex where I really don't like showing up anywhere without something. So today I was going to my friend's house and I had exactly one hour before I was supposed to be there. PERFECT! Just enough time to either watch one episode of Gilmore Girls or..... bake a batch of something chocolaty, delicious, and that will still be warm by the arrive!

So I found my favorite cookbook and found an awesome recipe! I changed it a LITTLE (aka doubled the vanilla- an old pasty chef trick) but I kept these ones classic. So get your spatulas ready and preheat your oven to 350 degrees!

Chewy Chocolate Chip Cookie Bars
(Makes 12)

You will need:
2 tbsp. Margarine or butter, melted
1 cup brown sugar
1 tsp. vanilla (if you have good vanilla, thro
w in another teaspoon just for good luck!)
1 large egg
3/4 cup flour
1 tsp. baking powder
1/4 tsp. salt
1/2 cup chocolate chips

1. PREHEAT OVEN TO 350 DEGREES- In a medium bowl, combine melted margarine, brown sugar, and vanilla. Add egg and stir until smooth.

2. In a small bowl, combine flour, baking powder and salt. Add to the egg mixture and stir until almost combined. Add chocolate chips, and stir until blended.

3. Spray an 8" x 8" pan with nonstick spray. Bake for 25-30 minutes until golden brown. (Don't over bake it though! Or you'll take one of the "C's" out of the CCCCB's! )Cool for a few minutes before cutting into the bars.


**Tip**Tip**Hey! I've got a tip for you!**Tip**Tip**
When you are making cookies, make sure you don't over mix your dough. Mix the dry ingredients with the wet ingredients in as few stirs as possible. Once its combined, leave it! When you stir, you help the gluten form, which is good for bread, but why would you want to make tough cookies?

Up next? Mocha Chocolate Chip Brownies made with a VERY special ingredient!

November 7, 2009

Homemade Cookie Dough Ice Cream


For those of you who know me you may know that I have a vice or two, one of them being ice cream. My favourite flavors are: mint chocolate chip, maple walnut, plan ol' vanilla bean, rich chocolate fudge (with peanut butter), raspberry bugaboo, AND cookie dough!


My room mate Jenny and my Don Mitch decided to have a belated birthday celebration in honor of mine and Mitch's 20th birthdays! But mainly we wanted a reason to make cookie dough ice cream. Not gonna lie.


Now Jenny and Mitch seem to think I am a 'grandma' because I suggested rolling the cookie dough into little balls and freezing it (creating mixable--not squishable--cookie pieces), and because I told Mitch to leave the ice cream out to melt slightly a bit before we mixed in the cookie pieces.


That's just common sense and good advice if you ask me!

Apparently it is complete hilarity to some, and causes side stitching laughter. Very well.
Oh and they might have also made fun of me for telling Jenny not to 'aggravate the gluten' in the cookie dough by mixing it too long.

Pft. So I'm full of random cooking tips; sue me! This is why I'm the one with the blog.

Anyway, the final product was reaaaaaly yummy and I took some pictures for you all to enjoy. (Causing further outbursts of howling laughter and red faces.)
At least my hilarity causes people to smile. And so I laugh along, because if I'm laughing too, they are laughing with me, not at me. Silly common folk.

Luv you guys!

Note to the disclaimer: This recipie does permit eating raw eggs- it's raw cookie dough. So, you've been warned! However I have been eating cookie dough my whole life, and I'm just dandy.

Ingredients:

1 tub vanilla ice cream, slightly softened
a few almonds

2 1/4 c. all-purpose flour
1 tsp. baking soda
1 tsp. salt
1 c. (2 sticks, 1/2 pound) butter, softened3/4 c. granulated [white] sugar
3/4 c. packed brown sugar1 tsp. vanilla extract
2 eggs
2 c. (12-ounce package) milk chocolate chips

Directions:

1. Combine flour, baking soda and salt in small bowl.

2. Beat butter, granulated sugar, brown sugar and vanilla
in large mixer bowl. Add eggs one at a time, beating well after each addition; gradually beat in flour mixture.

3. When everything is combined, allow the dough to sit in the fridge for about 15 minutes so that the butter hardens slightly. (This will make the next step a bit easier)

4. Remove dough from the fridge and form small bite size morsels of dough, placing them (seperated) on a tray. Assemble enough for your servings of ice cream. Place tray in the freezer for 20 minutes.

5. Scoop softened (but not melted) ice cream into a bowl and mix in cookie dough. Top with almonds, (take a pretty picture of your creation), and enjoy!


October 11, 2009

Elephant Ear Ice Cream


I bet you have, (if never indulged), at least smelled this delicious treat at a fair or two. I know my nose has led me many a time, right over to the large bus on wheels which deep fries dough to perfection, and tops it with way too much sugar/cinnamon/chocolate/whip cream/fruit/or all of the above.

The 'Elephant Ear' is a classic.

But before you start searching for the closest carnival, I will let you in on a little secret. The delicious sweet flavor of the 'Elephant Ear' is closer than you think! In fact, you can re-create it your kitchen using only 4 ingredients, and no deep frier! My best friend Leah has re-created it in ice cream form.


Now I don't exaggerate, this stuff tastes like the real thing! (Especially the variety topped with cinnamon and sugar.) I'll admit the temperature and texture are slightly different, but it makes no difference in getting across a serious 'Elephant Ear' flavor! And you will never guess what's in it.


Good thing I'm going to tell you!

Your Welcome.

Ingredients:

For one serving.

2 large scoops of vanilla ice cream/frozen yogurt
1 tsp. real cocoa
1/8 tsp. cinnamon
1/2 tsp. large crystal sugar, like turbanado (If you don't have a larger suga
r variety you can leave out this ingredient and it will still taste the same--it's used for texture)

You can top the finished ice cream with fruit or extra 'Elephant Ear' toppings if you wish:)

Directions:

1. Scoop ice cream into a bowl and allow to sit for a minute or two to soften.

2. Sprinkle with cocoa, cinnamon, sugar, and stir. Combine all ingredients well, or at least until the dry powdery cocoa is combined. It can be slightly marbled in colour OR you can combine it completely until it it is one solid colour.

3. Serve into a new bowl if desired.

Enjoy!

Elephant Ear photo courtesy of http://farm2.static.flickr.com/1020/
1332875893_21a32e0a25.jpg

July 11, 2009

Raspberry Lime Icing

It's summer time - and summer means hanging out with the friends. Because I am working at camp all summer, my weekends are the only time where a hangout is even possible. (Along with free time, daily showers, whole grains, and consistent blogging). Today I'm off to my friend Becky's house for some fun with the gang.

I decided to bring along a yummy treat: Raspberry Lime Iced Cupcakes.

I couldn't turn down the opportunity to make a new cupcake recipe, and I must say that this one has become one of my favorites. (Hello bake sale idea!) It is made with the simplest of ingredients: fresh raspberries, lime juice and zest, and finally, icing sugar.

You mash the fresh raspberries with a little bit of sugar so that they create a really fresh, red pulp. To this you add the juice and zest of one lime. This puree can stand on it's own with just a touch of sugar as a topping for waffles or pancakes. If you feel like being really fancy, put some into a piping bag and pipe a small bit into the center of a cupcake. Ice over top of that hole and your done! This could be a great afternoon activity with the girlfriends or kids.

Ingredients:

I iced 12 cupcakes. If you had more cupcakes, you can simply adjust the amounts accordingly.

12 fresh raspberries (for on top of the cupcake)
approx. 3/4 c fresh raspberries, mashed
1 lime, zested
approx. 1 1/2c icing sugar, sifted

Directions:

1. Begin by sifting your icing sugar into a bowl.

2. In a separate bowl, mash the raspberries until fairly smooth and add the juice/zest from one lime.

3. Combine a small amount of the raspberry puree into the icing sugar (about 2 Tbsp.) and stir. Continue to add small amounts of the puree until the icing has formed a desired consistency.

4. Ice cupcakes, and top with a fresh raspberry.

June 15, 2009

Toast with Peanut Butter and Strawberry...Jam??

Okay, Okay so the jam part of this little breakfast/night-time snack isn't really jam at all.

I took the most important part of the jam and made that the focus. I do really like jam, don't get me wrong. But sometimes, if I have the option of eating something in its natural state, then I will.

I know! It's crazy that sometimes people like to eat things that haven't seen an oven/microwave/stove top or packaging factory.

So for instance, instead of apple martinis, try an apple. Or instead of corn flavored popcorn, try corn. The distance we are going from the food that we grow is amazing. (If your interested in learning more about eating things that are local and perhaps in their natural state, check out the 100 mile diet here).

I got some gorgeous local strawberries today, so before topping my typical bed-time snack of PB on toast with banana, I went for the strawberries instead! I then drizzled it with honey and MMMmmmm....It was so yummy. The fresh strawberries added such a light note to the snack. In fact I didn't even need a glass of milk to wash it down. That never happens with peanut butter!

Ingredients:

1 piece rye bread, toasted
2 Tbsp. peanut butter
4 local strawberries, sliced thinly
1 Tbsp. honey

Directions:

1. Toast rye bread, and spread with peanut butter. Layer the strawberry slices over the bread and drizzle with honey.

Enjoy!

June 9, 2009

Boston Cream Cupcakes


When you get the option, what kind of doughnut would you choose? Honey dip, sprinkled, powdered and fruit filled, maple glazed, chocolate, or would you pick a boston cream? It is definitely one of my favourites! It's creamy and chocolaty, and best of all...it's not missing the center! (The extra bit of doughnut usually gets made into timbits (if you are from Canada) which cost 17 cents each.) Mmhmm...you definitely beat the system with the boston cream.

All this talk about doughnuts is getting me distracted from my actual purpose today. I don't plan on sharing a recipe with you about doughnuts actually, as you can see from the posts' title. I was simply inspired by the doughnut (which is technically inspired by the boston cream pie) in a way that brought new possibilities to the desert. I thought, why not make my childhood favorite into a cupcake? Many thanks to Martha Stewart's Living Magazine for providing the recipe.

This spongy vanilla cupcake is cut through the center and filled with a smooth vanilla cream, topped with more cake, and smothered in chocolate ganache...

I enjoyed the final product so much that I decided to have a little "photo shoot" of sorts. Featuring: the cupcake, a white plate, my table makes an occasional appearance, and some blurry backdrops.

Timmes ain't got nothin' on these babies!


Ingredients:

Makes 18

Cupcakes:

1 1/2 c. all purpose flour, plus more for tins
1 1/2 tsp. baking powder
1/2 tsp. salt
1/2 c. whole milk
3 oz. (6 Tbsp.) unsalted butter, softened, plus more for tins
3 large Eggs
1 c. sugar
1 tsp. pure vanilla extract

Vanilla Cream:

2 large egg yolks
1/4 c. sugar
2 Tbsp. plus 1/2 tsp. cornstarch
pinch of salt
1 c. whole milk
1/2 tsp. pure vanilla extract

Chocolate- Ganache Glaze:

2/3 c. heavy cream
6 oz. semisweet chocolate, finely chopped
1 Tbsp. light corn syrup


Directions:

Cupcakes:

1. Preheat oven to 350 degrees. Butter and flour standard muffin tins. Whisk together flour, baking powder, and salt in a small bowl. Warm Milk and butter in a sauce pan over low heat.

2. Beat eggs and sugar with a mixer on high speed until thick and pale, about 5 minutes. Beat in dry ingredients.

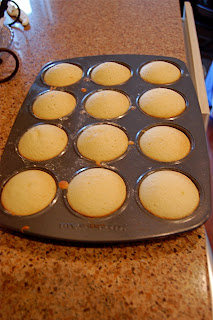
3. Bring milk and butter to a boil. With mixer on low speed, add milk mixture to batter and beat until smooth. Add vanilla. Divide batter among muffin cups, filling each halfway. Bake cupcakes until light gold, about 15 minutes. Let cool in tins for 10 minutes, then transfer to wire racks. Let cool.

4. Using a serrated knife, cut each in half horizontally. Spread 1 Tbsp. vanilla cream on each cupcake bottom. Sandwich with top. Spoon glaze over each and serve immediately.

Vanilla Cream:

1. Whisk yolks until smooth. Mix sugar, cornstarch, and salt in a medium saucepan over medium heat. Add milk in a slow, steady stream. Cook, stirring, until mixture begins to bubble and thicken, about 5 minutes.

2. Pour a third of milk mixture into yolks, whisking constantly. Return mixture to saucepan, and cook over medium heat, stirring often, until thick, 2 to 4 minutes. Stir in Vanilla.

3. Pass vanilla cream through a fine sieve into a bowl. Press plastic directly on surface. Refrigerate until cold, at least 1 hour, or up to 2 days.

Chocolate- Ganache Glaze:

1. Bring cream to a boil in a small saucepan. Remove from heat, and add chocolate and corn syrup. Let stand for 5 minutes. Whisk until smooth. Transfer to a bowl, and let cool, stirring often. Use immediately.

Simple Banana Desert

I don't know about you, but I really enjoy desert after dinner. Especially when the meal was particularly salty. I need to balance out the flavors with some sweetness after all. It is a necessity that this be done or else I crave sugar for about 2 hours after dinner, and no one wants that!

I'm only half serious:) I could go without, and most of the time choose to. But when I have bright yellow bananas sitting on my counter top calling out to me, I feel pretty good about the decision to indulge in sweetness.

Today I made a really simple and quick desert: bananas glazed with maple syrup and spiced with nutmeg and cinnamon, served with vanilla frozen yogurt. Doesn't that sound good? Simple though too. Because something really yummy (and satisfyingly sweet) doesn't have to be complicated. I leave those dishes to moments when I have a whole afternoon to bake.

However, once it was sitting before me, I realized that something was missing...


...mmhm that's more like it!


Ingredients:

1 fresh banana, sliced
1 tsp butter
2 Tbsp. maple syrup
1/8 tsp. cinnamon
1/8 tsp. nutmeg
2 scoops vanilla frozen yogurt (or regular ice cream)
1 strawberry

Directions:

1. Melt butter in a warm skillet, and place sliced bananas, flat side down. Toss the bananas with the maple syrup and spices. Cook for a few minutes (or until the bottom of the bananas has browned)

2. Assemble atop the frozen yogurt with the lone strawberry.

It's as simple as that! Enjoy.

May 30, 2009

Mocha Cupcakes


I have developed a serious appreciation for cupcakes and can't help but wish that I had a job title like, "Senior Executive Cupcake Decorator and Taster." Mmhmm that would be pretty sweet, no pun intended. I would be in the professional cupcake world! And what a place it would be...

Butter cream frosting taste-tests, classes on "how to dress your cupcake," and "the proper way to fill a cupcake tray," our stock and inventory would consist of blue, pink, and yellow sprinkles, edible silver and gold, icing sugar by the truck load, and chocolate.

So in the mean time, before the cupcake artisans come knocking at my door, I will ready my skills.

Leah and I always get inspired by the cupcake "boutique" at the market down town. They have so many flavors and the set up is, as Leah would put it, "so dang cute." But after you realize that these adorable creations are about 4 dollars each, homemade cupcakes become verrry appealing.

The boutique's mocha cupcakes inspired Leah to create this recipe from a simple box mix. I decided on a butter cream icing because...well, who doesn't like butter cream icing!?

Case and point:

Enjoy being a cupcake artist!

Directions:

Cupcakes:
1 box chocolate cake mix
Cold prepared coffee

Mocha Butter Cream Icing:

1/4 cup butter
1/8 cup cocoa powder
1/2cup milk
1 1/2 cups powdered sugar (sifted)
1 1/2 tsp. instant coffee

Directions:

1. Prepare cupcakes according to directions on box, but substitue the water for coffee.

2. For the icing: Heat butter, cocoa, and milk and bring to a boil.

3. Add instant coffee and stir until combined.

4. Add powdered sugar and beat until nice and smooth. Let sit to cool.

5. When cupcakes are done, allow them to cool before you ice them. (This is very important, especially with a runnier icing like this one.)

5. To ice: Dip cupcake into the icing until the top is coated. Remove from icing while twirling the cupcake. (This allows excess icing to drip off). Set on a tray and sprinkle regular sugar on top, if desired.