Showing posts with label Herbs/Spice and Everything Nice. Show all posts

January 3, 2011

The Verdict

Start here:


And end happy! This sauce mix is inexpensive and it couldn't be easier. Simply add water, butter, coconut milk, and your own chicken. I really like butter chicken, and of all of the sauce bases I've tried, this has been my favourite.

November 26, 2010

Thai Chicken Lemongrass Soup


It's a shame that it took me so long to make my own Thai food. I have this new found fascination with all things Thai, but I had this idea that it was going to hard, (It wasn't), and that the ingredients were going to be impossible to find, (They weren't).


For me, what decides if I will make a recipe is if I have the ingredients or not. Duh. And if they don't seem too far out of reach. The problem was that Thai food has some ingredients that I was not about to stock in my pantry. (Read: fish sauce and oyster sauce).

Bleh. Am I right? The sound of it....

But had I ever actually tried the stuff? Well, no.

And do I not eat Thai food on a regular basis and quite enjoy its flavor? Um. Yes.

So my challenge to you, is to buy the bottles of stuff which seem scary, and I guarantee once you have them you will find the motivation to cook Thai food. And you will like it. When ingredients like these are in your pantry, you open the doors to so many dishes. And the rest of the ingredient list, albeit long, will be fresh and easy to find. (Please don't hunt me down and quote me if your recipe calls for turtle shell or something ridiculous). Every culture has its quirks.

(Have you seen what is in Western food?)

We have beef fat in Hostess products, crushed red bugs as food colouring, and beetle juice in sprinkles.

But I digress.

This soup is wonderful because it highlights what asian cooks have mastered: balance. Hot, sweet, spicy, sour--all at once. Try it once and I guarantee you will be so inspired you'll be throwin' oyster sauce into stuff left, right, and centre. I am. (See here.)

And not only is it delicious, it is also very chic. (Once you've cleaned up).


Serves 2-3
Ingredients:

12-16 oz. fresh egg noodles (or enough dry for 2-3 portions) or rice noodles
6 c good quality chicken stock
1-2 stocks fresh lemongrass, minced (Use this link if you don't know how to prepare it)
1/4 - 1/2 lb cooked chicken breast or thigh chopped into small pieces (or use leftover roasted chicken)
1/2 c good quality cocoanut milk
3-4 kaffir lime leaves (available fresh or frozen at asian grocery stores)
3 cloves of garlic, minced
1 thumb size piece of ginger, shredded
1 red chili, sliced (take the seeds out if you don't like it spicy--it will be spicy!)
1 lg carrot sliced
1 Tbsp oyster sauce (I used Golden Dragon brand)
1 Tbsp brown sugar
2 Tbsp fish sauce
2-3 c bok choy, chopped
generous handful of fresh cilantro (if you like it)
1 Tbsp fresh lime juice, optional

Directions:

1. Prepare the noodles according to the instructions on the package. Drain and rinse with cold water to keep from sticking. Set aside

2. Bring stock to a boil in a large soup pot. Add the prepared lemongrass, kaffir lime leaves, and the chicken. Boil over medium-high heat 3-4 minutes.

3. Reduce to medium heat and add the garlic, ginger, chili, and carrot. Simmer 2-3 more minutes.

4. While soup is simmering, add the oyster sauce and fish sauce, as well as the brown sugar.

5. If your bok choy is the large variety, add only the thick white stalk pieces now (the green leaves take only seconds to cook so reserve those for later). Continue simmering 2-3 minutes.

6. Lastly, add the leafy greens of the bok choy. Stir and simmer 30 seconds.

7. Reduce heat to low. Add the cocoanut milk, stirring well to incorporate.

8. Taste-test for salt, adding more fish sauce if it is not salty enough. If too salty or sweet for your taste, 1 Tbsp lime juice. If too spicy, add more cocoanut milk.

9. To put the soup together, mound a generous amount of the cooked noodles in each bowl. Ladle over the hot soup and top with fresh cilantro.

Enjoy!

October 14, 2010

Ginger Cookies


My house currently smells like the pioneer village I went to on a field trip as a kid. We toured an old-style living quarters and school house, learned how on earth the pioneers did it all, and munched on ginger cookies followed by hot apple cider. You really get the false impression that living as a pioneer was easy.

(I mean they didn't have these!)


And also that they ate a lot of ginger cookies.

It's probably not true, but for the sake of this post we can pretend that they did! I did/am currently doing the same.

Nomm, nom nom.

Ingredients:

2 1/2 c whole wheat pastry flour
2 tsp baking soda
1 egg
3/4 c oil (something of a light variety like canola walnut or sunflower)
1/4 c molasses
1/4 c real maple syrup
1/2 c sucanant or maple sugar
1 tsp ginger
1/2 tsp cinnamon
1/4 tsp ground cloves
1/4 tsp salt
1/2 tsp cardamon

Directions:

1. Mix dry ingredients and set aside.

2. In a mixer or by hand, combine wet ingredients until well combined. Slowly stir in dry ingredients and you will have a moist cookie dough.

3. Let dough sit in the fridge for 20-30 minutes to firm up.

4. Roll the dough into teaspoon size balls, roll in maple sugar if you wish, and slightly flatten. Place on a cookie tray.

5. Bake @ 350 for 8-10 minutes. Enjoy with a tall glass of milk!

Source: mycharmingkids.net

June 27, 2010

Kitchen Sink Chili


Does anyone out there not like chili? Okay, there are a few of you. And you have my special permission to skip over this post (Oh don't, your call...), but if you do enjoy the rich tomatoey flavor of chili, and the buttery bread which you may dip into it, take note!

This one is a keeper.

I have posted about chili before (see here), and that recipe is still a great standby for me. It takes less ingredients and only about an hour from start to finish. It's very forgiving.

But for tonight's dinner I pull another recipe from theBite Me files, (Cookbook by Julie Albert & Lisa Gnat). Just wait until you see what lies behind it's rich flavor! I'll give you a hint...it rhymes with BOGO.

Can you guess??

The rich flavors are enhanced by many spices including cumin, chili powder (of course!), oregano, cayenne, Aaaaaaaaand....


Cocoa powder. If you can believe it. The cocoa gives the chili, not a chocolately taste, but a deepened rich flavor.

It's meaty (if you want--vegetarian works too!), vegetab-ly(?) and delicous, and I had a simple time preparing it. You can do it over the stove top if you prefer, or if you're like me and don't have time to spare, the slow cooker works perfectly fine! (Just remember to pre-cook your meat and onions.)

Serve with caesar salad, a ciabatta loaf, cheddar cheese, and red wine.

Ingredients:

1 lb. lean ground beef
1 Tbsp. canola oil
1 medium red onion, chopped
1 Tbsp. chili powder
1 tsp dried oregano
1 tsp ground cumin
1/2 tsp kosher salt
1/2 tsp freshly ground black pepper
2 large red bell peppers, chopped
2 c sliced white mushrooms
1 medium carrot, peeled and chopped
1 large garlic clove, minced
1/2 c canned chopped green chili peppers, drained
1 (28oz/796ml) can diced tomatoes with juice
2 c canned black beans, rinsed and drained
1 1/2 c canned chickpeas, rinsed and drained
1 1/2 c canned red kidney beans, rinsed and drained
1 c mild salsa
1 c vegetable broth
1/2 c cous cous (optional)
1 Tbsp. cocoa powder
1 tsp packed brown sugar
1/4 tsp cayenne pepper
1 cup frozen corn kernels, thawed
Shredded Montery Jack or cheddar cheese, for topping

Directions:

1. This recipe can be cooked either in a large soup pot over medium heat, or in a slow cooker on high.

2. For a meat version (optional), brown ground beef prior to placing into the slow cooker. Also brown the onions in a small amount of canola oil. Add to the slow cooker/pot and season with chili powder, oregano, cumin, salt and pepper.

2. Next add the red peppers, mushrooms, carrots, minced garlic and chopped green chili peppers. (If using a pot, cook approx. 5 minutes before going on to the next step, stirring occasionally). Stir in diced tomatoes, black beans, chickpeas, kidney beans, salsa, vegetable broth, couscous, cocoa powder, brown sugar, and cayenne pepper.

3. Bring to a boil over high heat/allow to simmer in slow cooker. On the stove reduce heat to low, and in the s-cooker, to medium. Simmer gently covered for 40 minutes, stirring occasionally. Add corn and serve in bowls, topped with shredded cheese.

June 16, 2010

Fiesta Bowl Salad


I've never been one for salads as a entrée. Gimme a caesar salad or garden on the side of something substantial like pasta or chicken, but on it's own I won't feel like my hunger has gone anywhere.

Accept maybe back into the pantry for some munchies.

I usually pitty the girls who order, "a small caesar with chicken, please" because not only are they missing out on what could be a bowl of saucy noodles or grilled steak, they are paying 15 dollars for lettuce. Laaame.

Sorry, I digress slightly.

My point is to draw your attention to a change of heart I had recently. This salad...this crazy delicious salad which I decided to get seconds of! It was yet another recipe from Bite Me, and it clobbered my perception of entrée salads.


Sweet and salty and savory and filling. Believe me, I wouldn't be saying that if it weren't true. And this homemade dressing had me cleaning out the bowl.

The contrasting texture of tortilla chips added crunch, and an avocado, freshness.

Note to vegetarians: you could easily ditch the chicken and add chickpeas or black beans!

Ingredients:

1 head iceberg (I used romaine because it was all I had at the time)
4 tomatoes, seeded and diced
1 avocado
1 roasted deli chicken breast meat shredded (I used sliced ham because I didn't have chicken)
3/4 c shredded cheddar or Monterey Jack cheese (Why is Monterey Jack capitalized?)

Salad Dressing:
1/2 c sour cream
1/2 c salsa
1/4 c mayonnaise
1/2 c canned chopped green chilies
1 lime, juiced
1 Tbsp sugar
1/2 tsp cumin
1/4 tsp chili powder

2 c crumbled tortilla chips, for topping

Directions:

1. Place lettuce, tomatoes, avocado, chicken, and grated cheese in a large bowl. (Or put into serving bowls. I did this so that everyone got equal toppings. Optional)

2. For the dressing, in a medium bowl, whisk sour cream, salsa, mayo, chopped green chilies, lime juice, sugar, cumin, and chili powder.

3. Add dressing to salad bowl tossing well to coat. Sprinkle salad with crumbled tortilla chips.

Serves 4

June 14, 2010

Wholesome Honey-Baked Granola


Every single recipe we pull from it has been easy to prepare and very tasty, not to mention that the recipes are comprised of lots of awesome (sometimes quirky!) ingredients. Sometimes I find recipes that only have simple items can be missing a certain je ne sais quoi, but these recipes make up for it! (Coco powder in chili!? Awesome.)

The book's brunch chapter features this delicious homemade granola, which is not only good on your digestive tract, but also good on your pocket book. Prepared granola in the grocery stores can run for $10 or more, depending on the brand. And for HALF of the portion you get here.

That's a no brainer if you ask me.

Granola is such a light yet hearty, crunchy yet soft, food. Yummy served over yogurt, ice cream, with milk and bananas (as seen above), as a muffin/crisp topping, or just on it's own. It's a huge money saver for lunches: Pack 1/2 cup in a re-sealable dish and pour it over fruit and yogurt when you are ready to eat.

Fun to prepare, and oh-so satisfying, I know you will love it.

Ingredients:
4 c old-fashioned large flake oats (not quick cooking)
1 c slivered almonds
small handful of ground flax seed (this was my addition--just because I try to add flax seed to everything possible)
1 tsp kosher salt (I found this to be slightly salty for my taste)
1/2 tsp ground cinnamon
1/2 c melted butter (I used canola oil instead)
1/2 c packed brown sugar
1/4 c honey
1 tsp vanilla extract
1 c dried cranberries
1/2 c raisins

Directions:
1. Preheat oven to 300 F--Line a baking sheet with parchment paper.

2. In a large bowl, combine oats, almonds, flaxseed, salt, and cinnamon.

3. In a small bowl, combine melted butter (or oil), brown sugar, honey, and vanilla. Whisk well and pour over oat mixture. Toss to combine and spread granola over prepared baking sheet.

4. Bake 20 minutes, stir carefully and then continue to bake for another 15 minutes. Remove from oven, transfer to large bowl. Add dried cranberries and raisins, mixing to combine. Cool completely and store at room temp. in an air tight container for up to 1 week.

Yield: 7 cups

Cookbook photo courtesy of http://www.torontolife.com/daily/wp-content/uploads/2009/10/BiteMeCookbook.jpg

June 11, 2010

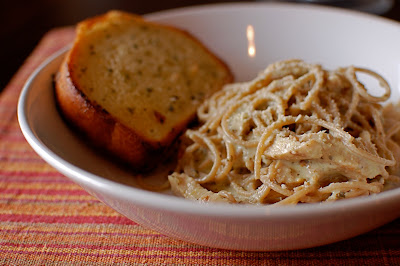
Chicken Pesto Pasta

Many of you know that pasta is one of my favourite things to make! I think it is because there are unlimited ways to make it, and most of the time my attempts are fairly successful. Oh, and it's deeeeeeeelicious. Ahem.

I've tried pasta carbonara (you'll see this post soon), rose sauces, creamy alfredo, meatless vegetarian concoctions, oil and spice, meatballs...and the list goes on!

I took a chance tonight on a chicken pesto pasta sauce. I say chance because I haven't made one before and I wasn't using a recipe. But how hard can it be? Right?

Chicken, milk, pesto, parmesan cheese...these are all familiar ingredients.


In the end it turned out quite nicely! Familiar ingredients, which I always like, and no time at all. Serve yours with toasted garlic bread. Mmmmm....

Ingredients:

1/2 (16 ounce) package spaghetti/linguine pasta
1 Tbsp canola oil
1/2 small onion, chopped
4 cloves garlic, sliced
1/4 c butter
1 Tbsp all-purpose flour
1 c milk
1/2 punch salt
1/2 pinch pepper
3/4 c grated parmesan cheese
1/2 c basil pesto
chicken, sliced and cooked (about 3oz person)

Directions:

1. Bring a large pot of salted water to a boil. Add pasta and cook for 8-10 minutes or until el dante; drain.

2. Heat canola oil in a large sauce pan over medium heat. Sautee onions until tender. Stir in garlic and butter, and sauté until garlic is soft and fragrant, about 1 minute. Disolve flour in milk and then stir in. Season with salt and pepper and simmer for approx. 4 minutes, stirring constantly. Add cheese and stir until melted. Stir in pesto.

3. Add cooked chicken (I used precooked, frozen, and reheated) and pasta to sauce, and serve.

April 30, 2010

Simple Cinnamon Hazelnut Latte


Now, I don't know how all of my Starbucks friends will feel about this one. I imagine this latte is not as authentic and amazing as their barista styled concoctions, however Leah (a barista herself) taught me how to make it so it must be legit, and this one has it's advantages! It's delicious and easy and cheap, plus like the Starbucks version, it is caffeinated.

When I am in a coffee phase (which actually isn't often... sometimes coffee hurts my belly), this latte makes a satisfying morning treat.

I just love waking up to the smell of coffee, don't you? Relaxing before work with a newspaper and coffee? Delightful.

Ingredients:

(per 1 latte)

1/2 c skim milk (adjust to your coffee preferences--less if you need more coffee flavor, and more if you only want a hint of coffee)
1 tsp sugar--can also use flavored syrup (if desired)
hazelnut coffee, brewed
cinnamon and sugar, mixed

a handheld milk frother (available for around $10 at your local supermarket)

Directions:

1. Pour the skim milk and sugar/syrup into your favourite mug and microwave until very warm.

2. Using the handheld milk frother, froth the milk until there is a light and airy consistency at the top of your drink. (At least 10 sec) TIP: Don't touch the milk frother to the bottom of the mug, as for some reason this prevents proper frothing.

3. Pour brewed coffee (very gently) down the side of the mug, as to not ruin the foam, and fill mug.

4. Top with cinnamon and sugar and voila!

November 4, 2009

Sauteed Potato Hash-Browns


Hash-Browns
I luuuv hash-browns.
Hash-browns with eggs and ketchup.
Hash-browns at the diner with lunch and fresh fruit.
Hash-browns for dinner.
Hash-browns the morning after meat and potatoes.
Hash-browns with maple syrup. Seriously, but just a dab.

Ingredients:
chili powder, garlic powder, salt and pepper, herbs de Provence, and any other savory seasoning you like, (No over kill, please.) butter, and olive oil.

Directions:
1. Cook potatoes until just underdone and let sit in the fridge to cool and firm up. This is what makes day old cooked potatoes the perfect leftover.

2. Melt a dab of butter and a Tbsp of oil in the frying pan, and then gently place potatoes into the pan. (Careful, don't splatter!)

3. Add seasonings and toss the potatoes in the pan until fully coated. Cook until brown, hot and there are some nice pan marks. (Grill marks, but from a pan.)

November 2, 2009

Bed & Breakfast: Orange French Toast


The Peach Grove Bed & Breakfast: one of the prettiest places I have ever stayed. Let me attempt to set the scene for you.

I was 12 years old, and my parents, sister, and my Uncle George all took a road trip to New York, tracking down the ol' family homestead. You see, my Uncle George loves himself some genealogy. And we, as a family, are indebted to him for much of the information we have in our noggins and published. Yes, that's right, we have a family book. I'm not in it because it was published before I was born, but anyways, almost the whole family is in it.

Our family lineage begins in the New York State area where we stayed for a few days before heading to the Big Apple!

I had never stayed in a B&B before so my parents thought it would be a nice addition to our trip. And let me tell you, it was stunning. An old Victorian home, black shutters, a large porch at the front of the house--very Notebook-esque.

Here is the photo I got off of their website:


See?

The home was full of old antiques, a baby grand piano, and had a lovely sun room off the back where we had our tea and breakfast.

Breakfast was an option of (I think) eggs or orange french toast. Orange french toast sounded interesting so we went for the second option. Today I present to you, my version of this breakfast from the B&B tucked away in Warwick, New York. If my taste bud recollection serves me correctly, this version is pretty darn close.


Ingredients:

(Makes 3 pieces of french toast)

3 pieces of 12 grain bread (or you can use texas toast if you wish)
2 eggs
1 Tbsp. real vanilla extract
1 Tbsp. orange juice concentrate
cinnamon

Directions:

1. Mix eggs in a large bowl and combine vanilla and orange juice concentrate. Stir until the concentrate has melted.

2. Dip both sides of the bread into the egg mixture and place in a pan over medium heat. Sprinkle the top with cinnamon.

3. Cook both sides until the bread is slightly toasted and no longer soggy (about 2 minutes on the first side and 1 on the other.)

4. Serve with yogurt, fresh fruit, and maple syrup.


October 13, 2009

Apple Gingerbread Sweet Potatoes


This recipe brings warmth to any meal. I bring it forth as a nomination for the category of "yummy creative side dish made in under 30 minutes", in the food Oscars. Do they have those? They should.

The combination of smooth and creamy sweet potatoes, gingerbread tea which can be cooked directly into the potato, honey, tart and crunchy apples, topped with nuts, dried fruit, and sugar, makes for a satisfying side dish.

I might add that I made these potatoes right after class and in-between homework sessions, so they are pretty easy if you have the right ingredients in your pantry. I literally kept throwing matching flavors into this dish because sweet potatoes are a very versatile vegetable. Sweet, but not too much, so you can add a seasonal flare to them like I did here. Crumbled up gingerbread cookies on top would be a nice addition as well.

You can use any type of gingerbread or cinnamon tea to infuse the potatoes that you can find. I bought mine at the grocery store and have had it sitting around for 2 years, and thought, It's about time to put this tea to some use! So I did. When the water with the potatoes in it comes to a boil, I let one of these seasonal tea bags and 3 black peppercorns steep for about 2 minutes, and the potatoes took on a great flavor!


You can use this same trick when making potato salad. Put a few garlic cloves in the water while the potatoes cook, and they will taste like garlic!

Combine some fresh apples into the cooked and mashed potatoes, cinnamon, and honey or brown sugar.


I didn't cook mine for too long because I didn't want the nuts to potentially burn, but you could leave yours in longer if you left the nuts off until a bit later into the cooking process. Maybe your sugar will caramelize more than mine did.

Ingredients:

(For one portion)

1 medium size sweet potato, peeled and chopped into 1'' pieces
1 gingerbread tea bag (or chai/cinnamon/etc.)
3 black peppercorns
1/2 medium size apple, chopped (I used an Empire apple)
1 tsp. butter (optional)
1 tsp. honey or brown sugar
1/4 tsp. cinnamon
a few pinches of large crystal sugar (like turbanado)
a handful of mixed nuts/dried fruit

Directions:

1. Cook peeled and cut potatoes into a pot full of cold water on high. When water comes to a boil, place tea bag and peppercorns into the pot (steep for 2 minutes) and allow the potatoes to cook another 8 minutes, or until the potatoes are tender enough to be be cut with a fork. Drain.

2. Mash potatoes, cinnamon, honey, and butter in a bowl with a fork until smooth. Stir chopped apples in gently.

3. Spoon mixture into a oven safe dish, and top with mixed nuts/fruit and sugar of choice.

4. Cook on broil for approx. 5 minutes. (You can cook it longer if you want the sugar to melt further, but watch so that it doesn't burn.)

October 11, 2009

Elephant Ear Ice Cream


I bet you have, (if never indulged), at least smelled this delicious treat at a fair or two. I know my nose has led me many a time, right over to the large bus on wheels which deep fries dough to perfection, and tops it with way too much sugar/cinnamon/chocolate/whip cream/fruit/or all of the above.

The 'Elephant Ear' is a classic.

But before you start searching for the closest carnival, I will let you in on a little secret. The delicious sweet flavor of the 'Elephant Ear' is closer than you think! In fact, you can re-create it your kitchen using only 4 ingredients, and no deep frier! My best friend Leah has re-created it in ice cream form.


Now I don't exaggerate, this stuff tastes like the real thing! (Especially the variety topped with cinnamon and sugar.) I'll admit the temperature and texture are slightly different, but it makes no difference in getting across a serious 'Elephant Ear' flavor! And you will never guess what's in it.


Good thing I'm going to tell you!

Your Welcome.

Ingredients:

For one serving.

2 large scoops of vanilla ice cream/frozen yogurt
1 tsp. real cocoa
1/8 tsp. cinnamon
1/2 tsp. large crystal sugar, like turbanado (If you don't have a larger suga
r variety you can leave out this ingredient and it will still taste the same--it's used for texture)

You can top the finished ice cream with fruit or extra 'Elephant Ear' toppings if you wish:)

Directions:

1. Scoop ice cream into a bowl and allow to sit for a minute or two to soften.

2. Sprinkle with cocoa, cinnamon, sugar, and stir. Combine all ingredients well, or at least until the dry powdery cocoa is combined. It can be slightly marbled in colour OR you can combine it completely until it it is one solid colour.

3. Serve into a new bowl if desired.

Enjoy!

Elephant Ear photo courtesy of http://farm2.static.flickr.com/1020/
1332875893_21a32e0a25.jpg

October 4, 2009

Baby Pun'kins and Mulled Cider

I went to the market today after church and bought these baby pumpkins (affectionately dubbed pun'kins):


Kinda inspired by the adorable pun'kins I taught in Sunday school this morning:)
"Okay Max, it's Jehova and YAH-way, not Jehova and HIGH-way. Nice try though."
So in the spirit of the fall weather and all that it brings (adorable pun'kins of all varieties), I did not hesitate in making my room even more 'fall-ish.'

See?


Okay. Okay.
So it probably doesn't look 'fall-ish' at all. But I'm workin' on it! Next project is a fall leaf collage. I'm thinking that once the leaves are nice and colourful, I will find a few pretty ones (not too difficult) and then dry them out in one of my over sized textbooks. (I knew those things would come in handy one day!) Then, once the leaves have fully dried out, you can make a collage with them! On a canvas, on a poster, which ever.

And to go along with this crafty endeavor, a hot glass of mulled cider should do the trick. Here is my recipe:

Julia's Mulled Apple Cider

Hot and spicy, this mulled cider will have you craving more all season long. Bring a thermos-full to work and share it with your friends. Or package up the spice mix in small baggies to give as gifts (for any occasion) with instructions on how to make it.

Ingredients:

Amounts can change depending on how much you are making, but I would suggest making a large batch, and cooling it in the fridge for later; rather than having to make each glass separately.

1 qt apple cider
1 cinnamon stick
20 whole black peppercorns
3 cloves
2 Tbsp. brown sugar
the zest from 1/2 of a lemon, or orange or from 3/4 of a lime
5-6 thin slices of fresh lemon or orange or lime

1 crock pot/slow cooker (if available)

Directions:

1. Place cinnamon, peppercorns and cloves into a saute pan at a low heat, just until you start to smell the aromas. This bring out the essential oils in each.

2. Plug in crock pot and set to a medium heat. I like to use a crock pot because I can heat things and walk away; the stove is not so forgiving.

3. Pour apple cider, spices, and sugar into the crock pot and stir gently.

4. 5 minutes later stir in the zest. Place lid on the crock pot and allow to simmer for at least 30 minutes. 25 minutes before serving, stir in fruit slices.

5. Pick out the cloves and peppercorns or strain the HOT apple cider in a fine mesh strainer but be very careful if you choose that method.

6. Serve in mugs with the cooked fruit slices and cinnamon sticks for garnish. Would also be nice with whip cream and a caramel drizzle.

Now, excuse me while I go 'mull' over my homework. A task that has not been attempted yet this evening. It's not my fault that I'd rather be making crafts and cider than reading 200 page articles ;)

September 10, 2009

Inexpensive Herbs de Provence


The latest and greatest flavor that I have found myself experimenting with, is Herbs de Provence.

The savory blend is a mix of herbs from Provence invented in the 1970s. The mixture typically contains savory, fennel, basil, thyme, and lavender flowers. The proportions vary by maker, however thyme is usually the dominant flavor.

Use it on chicken or on fish, during or before cooking, and you will enjoy such a simple, yet aromatic and flavorful dish.

Now.

I don't know about you, but when I find an herb that I really like, I can't help but want to invest in my own bottle. But oh the agony one feels when they find that very spice, priced for more than is reasonable. Williams-Sonoma carries the jar you see above for $24! You can get a less-attractive cardboard box version for around $16, but who wants to keep it in that.

How un-Provence like.

So I daresay I haven't bought any myself....that is until today.

I was grazing through the many tantalizing isles at Bulk Barn, buying almonds and dates to make veggie cereal with almond milk, and was stunned (kind of) when I stumbled across Herbs de Provence in the spice isle! First, I was like: No way! Why didn't I ever think of getting that here? Then after recovering from shock I bought a little sample. (Probably equivalent to half of Williams-Sonoma's box version.)

It was 20 cents. No joke.

So I took my prize herb mix home, quite excited about my amazing deal-finding skills, put it in a glass jar, and labeled it.

And NOW the secret is out.
Take that over priced herbs!

June 15, 2009

Summer Herb Garden

Do you say "h-erb" or "erb"?

Just curious.

I say "h-erb" most of the time. But occasionally I say "erb" by (accident) due to the fact that I really don't know how Canadians are supposed to say it. I once saw a video of an Australian girl who declared that down under, they pronounce it, "h-erb."

Am I being un-patriotic if I want to sound like an Australian sometimes?

Well, whichever way you pronounce 'herb', we are all talking about the same thing. Those brilliant flavor additions that can change the composition of an entire dish. And in my humble opinion, no garden is complete without some!

Today my mom and I bought a few new ones, and they are sitting beside my back deck awaiting my next meal. We went with our favourites: thyme (the lemon version) and basil. And a few new ones: dill and chives. I usually go about picking my herbs based on what is most familiar to me. If I know that a particular recipe that I love needs basil, for example, I will choose that herb in the hopes that I will find other recipes that will use it too.

Today instead of the regular basil, which was apparently sold out, we bought a Japanese basil. It smells the exact same as the regular stuff accept it has a pretty yellow border on each of the leaves. I think it will make for a really pretty garnish!


Going for the unfamiliar is sometimes fun! You can venture into a new flavor rhelm, equipt with new herbs that won't steer you wrong. I mean, have you ever tried an herb you didn't like?

Ok, wait. I have...

...cilantro.
Photo courtesy of http://pinchmysalt.com/wp-content/uploads/2007/07/cilantro-for-web.jpg

Bleh. (Sorry if you're a fan!)

But for the most part, I would say with conviction, that almost all herbs are delicious.

Get your green thumb going today and plant your favourites! (Making the transition from regular food to colourful, accented dishes, literally only a few steps away).

June 14, 2009

Quick and Delicious (but Forgiving) Chili


Chili has become one of my favourite foods to cook. It is fast, delicious, filling, easy on the pocket book, and best of all, it feeds a crowd! You would be surprised at how many people just show up unexpectedly when I make it. Go figure!

This recipe is as its name suggests, so quick, and so delicious; which is funny because the first time I decided to venture into the chili world I actually had no idea how to make it. The basic ingredients were understood but in terms of amounts and those secret, what is in here? ingredients, I had no clue.

So, suffice to say, from the tomato base to the spice mix, I just about guessed on everything.

And it actually turned out really well! I have been working on the recipe ever since, playing around with different things, and have found chili to be such a forgiving dish. You don't really need to know how much chili powder to add...just throw some in there, taste it, and chances are it won't be half bad. (Let's be realistic of course!)

Here is the go-to recipe that I use. Feel free to change around the beans or meat, add or subtract flavors, and make it your own. (I have tried different spices like Chinese 5 spice for richness, cayenne for heat, etc.)

Ingredients:

1 lb. ground turkey (Note: Turkey is much leaner than beef and bonus, in chili you can hardly taste the difference)
1 small can tomato paste
1 c. tomato sauce (amt can be adjusted depending on how thick you like your chili)
1 can kidney beans (not drained)
1 small cooking onion
1 green pepper, diced
1 can tomatoes (or use the regular ones-- the canned ones just have great seasoning already "built in")
1 pre-packaged chili seasoning mix (Or use regular chili powder)
black pepper, to taste

Directions:

1. Sautee onions in a large pot at medium heat until softened. Add your green peppers and (preferably) defrosted ground meat. Cook the meat until it is no longer pink and has been broken into small ground bits.

2. Add chili powder, the entire can of kidney beans (including the liquid- it adds flavor), the can of tomato paste, extra tomato sauce, canned tomatoes, and black pepper. Stir.

3. Simmer chili at low heat for at least 30 minutes and serve with cheese, nacho chips, sour cream, garlic bread, and/or cesar salad.

Note: Chili freezes great, but only freeze the chili after it has come to room temperature.

Photo courtesy of http://lukehoney.typepad.com/the_greasy_spoon/images/2007/10/04/chili_3.jpg

June 5, 2009

My Favourite Bruschetta


Every single time I buy a baguette, I think of this recipe.

The first time I tried it, years ago, I was at a dinner party my mom hosted. That night I lingered around the appetizer table and absolutely demolished these little babies.

Years later I shared the recipe with my best friend Sam and she fell in love with it too! I think she still cooks it with her family now and then. (On a side note, don't you love how food brings people together? My friends and I spent many after school evenings cooking things like...our favourite bruschetta!)

And if you must know, we also made Mr. Noodle, pasta with butter and salt, grilled cheese sandwiches, left overs, pizza, and other quick, not so healthy, hold-me-till-dinner meals.

What makes this recipe different than the usual bruschetta is that you get an amazing mixture of flavors and textures: sweet red tomatoes and basil, creamy and tangy mayo and cheese, and spicy pepper and oregano. This all warmed in the oven toasting the baguette and melting the cheese....MMmmm its making me hungry just thinking about it!


If you feel like being tres professional, try baking your own baguette! You can find a good recipie here.

Note: You can make this recipie the day before and chill. Spread it onto the bread just before baking.

Ingredients:

1/2 c. light mayo
1 c grated mozzarella cheese
2 medium tomatoes, halved, seeded and finely diced
1/4 cup freshly grated parmesean cheese (or 2 Tbsp. dry)
1 tsp. whole oregano
1/2 tsp. pepper
1/4 tsp. sweet basil
1 baguette
1/3 c. butter or margarine
garlic powder

Directions:

1. Preheat the oven to 350 degrees.

2. Mix the first 7 ingredients in a small bowl.

3. Cut baguette into 1 inch slices. Butter one side and sprikle lightly with a little garlic powder (as if you were making garlic bread). Arrange the bread, buttered side up, on an ungreased baking sheet.

4. Use a soup spoon to scoop the tomato mixture onto the bread. Press the mixture down well and then pull the spoon off smoothly. I find that using a spoon helps get the perfect amount, and it sets the mixture firmly onto the bread (not as many bits will fall off).

5. Bake in the oven for 15 minutes or until hot and the cheese is melted. Serve warm.

May 14, 2009

Vegetarian Chickpea and Peppers on Pasta


I am approaching the end of my school semester (finally!), but one of the things that comes with the territory, is a lack of food. Exams and stress aside, my pantry is slowly being emptied so that I don't waste anything as I head back home for the summer.

But not to worry, this story has a silver lining!

I have been forced to be really creative with the food I make! With only a few random ingredients, what is a person to do? It makes me smile actually because I like a good cooking challenge.

Of the remaining ingredients in my pantry, these were the ones I decided on: one lowly can of chick peas, vegi. fusilli, and Club house Roasted Garlic and Peppers seasoning spice.


They made a really yummy pasta that I will totally make again! The chick peas added an awesome source of protein and the pasta wasn't too heavy; great after workout food. Plus did I mention that I only used HALF the can of chick peas...this dish probably cost all of 1.00 to make.


I made a vegetarian version (because I am trying to eat a few vegetarian meals a week), but you could add chicken if you prefer. Fresh herbs and extra veggies would also be awesome. (Try parsley, or chives!)

Ingredients:

1 Tbsp. Club House Seasoning - Roasted Garlic and Peppers
1 Serving dry vegi fusilli
1 Tbsp. Olive Oil
1 Tbsp. Water
1/2 Can chick peas- drained

Directions:

1. Mix Club house seasoning, water, and olive oil and set to the side. (The time it takes to sit re-hydrates the garlic and peppers in the seasoning) After a few minutes, toss with chickpeas and let sit while pasta is cooking.

2. Cook pasta according to package directions

3. Top cooked pasta with seasoned chick peas and serve.