Showing posts with label Cheese. Show all posts

April 18, 2011

Homemade Pizza


Nothing like a little homemade pizza to get cha going. Or, in my case, get cha blogging. How have you guys been, anyhow? What's it been like 4 months since I've posted. Shaaame on me. It's been a great semester of school, and I am proud to say that I finished my last exam this morning! And I must say, Blogging was an obvious celebration technique for me. As is homemade pizza.


If you don't do this at home already, I highly reccomend that you try it soon. Start by buying some fresh pizza dough from the grocery store or make your own. I made this one out of a mix I found at the bulk barn. Just add water, black pepper, oil, and flax seeds.


Gather the kids, friends, and/or neighbors and let everyone add their own personal flare. You can't go wrong! My pizza is topped with spicy tomato sauce, spinach, tomatoes, green peppers and cheese--a valiant vegetarian combination, If I do say so myself.

January 5, 2011

Baked Macaroni and Cheese


What was one of the first things I (remember) learning how to cook? Macaroni and cheese. What did I request each and every time my mom went to work and dad was in charge of dinner? Macaroni and cheese. I love the stuff.

Naturally I am no novice to making it from scratch either, and this is a delicious recipe! I stumbled across it on another food blog, annies-eats.com. She claims that it is her favourite version. Unfortunately because I didn't have the cheese her recipe called for in my fridge, I can't be sure of her tastes validity. I'll give you the option of both (her cheese selection and my substitute), and you tell me. Or perhaps I will go make so more. Yep, I like that option.

Ingredients:

1 lb. small or medium pasta shells
5 Tbsp. unsalted butter, divided
1 c heavy cream
8oz. fontina cheese, shredded (I used old cheddar cheese, shredded)
1 tsp dry mustard
Pinch of grated nutmeg
Salt, freshly ground black pepper to taste
1/3 c panko bread crumbs
1/4 c freshly grated parmesan cheese

Directions:

1. Preheat the oven to 400 F. In a large pot of boiling salted water, cook the pasta according to the package directions just until 1-2 minutes shy of al dente.

2. Meanwhile, dice 4 Tbsp of the butter and place in a large mixing bowl. Warm the cream in a small saucepan or the microwave. Cover to keep warm.

3. Once the pasta is cooked, add tot he bowl with the butter and toss to coat well. Stir in the warm cream and the fontina cheese until the cheese starts to melt. Mix in salt to taste, and add the nutmeg.

4. Pour the mixture into a buttered 2-quart casserole dish. In a small bowl, melt the remaining 1 Tbsp of butter. Mix in the panko breadcrumbs and shredded parmesan. Toss with a fork to coat evenly with the butter. Sprinkle the bread crumb mixture evenly over the pasta in the baking dish.

5. Bake until the sauce is bubbling and the topping turns golden brown, about 20 minutes. Serve immediately.

December 17, 2010

Homemade Quiznos Sub

I have this thing for Quiznos. (If you do too, you're gonna love this).

For a really long time I was a Subway girl, but then I found Quiznos and I've never been able to go back to my old stomping ground. There is just something about the toasty bread, yummy sauces, and delectable flavor varieties which is somehow, so much better at Quiznos. (Sorry Subway...)

Anyway, this isn't an endorsement for Quiznos (you can send me my cheque later), because I don't do that sort of thing. I'm more into revealing the secrets to my favourite foods so that we all can save money by making these things at home! Muah ha ha!

This one is brilliant, if I do say so myself. And super simple. Start by finding a delicious loaf like the one you see pictured. It is an oat/seed/raisin variety that I found at Wall Mart. (Again, you can send me my cheque later). Cut it open just the way you like it; all the way through, like a pocket, whichever. Top it with mayo, a sliced deli meat like ham or turkey, a slice of swiss or provolone cheese AND (drum roll please)...a few shakes of italian spices. This makes it. I have a blend which has oregano and basil and it tastes just like the one from Quiznos. It's kind of weird that they thought to throw this onto a sandwich, but they knew what they we're doing!

Pop the sandwich under the broiler for a minute or two, and then top with your favourite toppings: lettuce, tomato, etc. One final tip, also add some cranberry sauce or sweet jam to your sandwich, and the sweetness will go really well with the salty meats.

And there you have it, a homemade Quiznos sub! I hope you find it as satisfying to make as home as I do.

July 13, 2010

Breakfast Blintz


There is a part of my childhood which I remember quite fondly. It would not surprise many to hear that it had to do with food. Food that I ate and thoroughly enjoyed as a kid still sticks with me, and to this day I can recall their textures and tastes. This can sometimes be unfortunate, as some of the restaurants which I really enjoyed are now closed or under different ownership, and no longer making the same food.

Alas, now I find myself trying to re-create many of my favourite dishes from my past. Like this breakfast blintz for example.


The year was 1998 and my family and I dined at a local jewish diner called Katzan-jammers. My mom loved the raspberry blintzes, but I thought they seemed too strange to eat. Eventually however I got a taste in (while making my parents and sister close their eyes), and exclaimed, "Mmmmmm!!! Soo goooood." I ordered the blintz every time we visited after that point. My only lament was that there were only 3 on my plate.

This morning I had a hankering for the soft, and delicious crepes filled with sweet cheese which are topped with fruit and icing sugar. Yes, my hankerings are that specific. So, the BF and I ventured into blintz territory, only to discover that they are quite simple to make!


They make a beautiful breakfast/brunch dish, or evening treat.

And before the formal instructions, here are some photo guidelines:

Ingredients:

Crepes:
1 c flour
2 Tbsp + 1tsp white sugar
1/2 tsp vanilla extract
1/2 tsp salt
3 eggs
1 1/4 cups milk
1 Tbsp vegetable oil

butter for the pan

Sweet cheese filling:
4 oz cream cheese
1 1/2 c ricotta cheese
1 egg
3 Tbsp powdered sugar
1 Tbsp orange zest (you can also use lemon if you prefer)

Fruit sauce:
1/4 c strawberry jam (I used strawberry but you can use whichever flavor you prefer)
1 Tbsp water

parchment paper
some extra powdered sugar
fresh fruit

Directions:

1. Mix crepe ingredients together. FYI the batter will be quite liquidy, so don't worry that you messed anything up. Allow to sit in the fridge for 30 minutes. Meanwhile mix together the sweet cheese filling!

2. For each crepe I used about 1/4 cup of the batter on a buttered crepe pan (or frying pan). Allow the crepes to cook for about a minute on one side, or until they seem "done," and flip for a few moments longer. Your will get better at this as you go!

2. When you have a whole stack of crepes you can begin to fill them. See photos above OR for an easy to follow video on how to fold your crepes, click here.

3. Place into a baking dish over parchment paper and cook @ 400 for approx 10 minutes.

4. While baking, mix the jam with a little bit of water in a sauce pan or in the microwave for approx. 25 seconds, or until soft and warm.

5. For your final presentation, spoon a dollop of fruit sauce onto a plate, followed by 3 baked crepes, a sprinkling of icing sugar, and some fresh fruit.

June 27, 2010

Kitchen Sink Chili


Does anyone out there not like chili? Okay, there are a few of you. And you have my special permission to skip over this post (Oh don't, your call...), but if you do enjoy the rich tomatoey flavor of chili, and the buttery bread which you may dip into it, take note!

This one is a keeper.

I have posted about chili before (see here), and that recipe is still a great standby for me. It takes less ingredients and only about an hour from start to finish. It's very forgiving.

But for tonight's dinner I pull another recipe from theBite Me files, (Cookbook by Julie Albert & Lisa Gnat). Just wait until you see what lies behind it's rich flavor! I'll give you a hint...it rhymes with BOGO.

Can you guess??

The rich flavors are enhanced by many spices including cumin, chili powder (of course!), oregano, cayenne, Aaaaaaaaand....


Cocoa powder. If you can believe it. The cocoa gives the chili, not a chocolately taste, but a deepened rich flavor.

It's meaty (if you want--vegetarian works too!), vegetab-ly(?) and delicous, and I had a simple time preparing it. You can do it over the stove top if you prefer, or if you're like me and don't have time to spare, the slow cooker works perfectly fine! (Just remember to pre-cook your meat and onions.)

Serve with caesar salad, a ciabatta loaf, cheddar cheese, and red wine.

Ingredients:

1 lb. lean ground beef
1 Tbsp. canola oil
1 medium red onion, chopped
1 Tbsp. chili powder
1 tsp dried oregano
1 tsp ground cumin
1/2 tsp kosher salt
1/2 tsp freshly ground black pepper
2 large red bell peppers, chopped
2 c sliced white mushrooms
1 medium carrot, peeled and chopped
1 large garlic clove, minced
1/2 c canned chopped green chili peppers, drained
1 (28oz/796ml) can diced tomatoes with juice
2 c canned black beans, rinsed and drained
1 1/2 c canned chickpeas, rinsed and drained
1 1/2 c canned red kidney beans, rinsed and drained
1 c mild salsa
1 c vegetable broth
1/2 c cous cous (optional)
1 Tbsp. cocoa powder
1 tsp packed brown sugar
1/4 tsp cayenne pepper
1 cup frozen corn kernels, thawed
Shredded Montery Jack or cheddar cheese, for topping

Directions:

1. This recipe can be cooked either in a large soup pot over medium heat, or in a slow cooker on high.

2. For a meat version (optional), brown ground beef prior to placing into the slow cooker. Also brown the onions in a small amount of canola oil. Add to the slow cooker/pot and season with chili powder, oregano, cumin, salt and pepper.

2. Next add the red peppers, mushrooms, carrots, minced garlic and chopped green chili peppers. (If using a pot, cook approx. 5 minutes before going on to the next step, stirring occasionally). Stir in diced tomatoes, black beans, chickpeas, kidney beans, salsa, vegetable broth, couscous, cocoa powder, brown sugar, and cayenne pepper.

3. Bring to a boil over high heat/allow to simmer in slow cooker. On the stove reduce heat to low, and in the s-cooker, to medium. Simmer gently covered for 40 minutes, stirring occasionally. Add corn and serve in bowls, topped with shredded cheese.

June 16, 2010

Wine and Cheese

Fiesta Bowl Salad


I've never been one for salads as a entrée. Gimme a caesar salad or garden on the side of something substantial like pasta or chicken, but on it's own I won't feel like my hunger has gone anywhere.

Accept maybe back into the pantry for some munchies.

I usually pitty the girls who order, "a small caesar with chicken, please" because not only are they missing out on what could be a bowl of saucy noodles or grilled steak, they are paying 15 dollars for lettuce. Laaame.

Sorry, I digress slightly.

My point is to draw your attention to a change of heart I had recently. This salad...this crazy delicious salad which I decided to get seconds of! It was yet another recipe from Bite Me, and it clobbered my perception of entrée salads.


Sweet and salty and savory and filling. Believe me, I wouldn't be saying that if it weren't true. And this homemade dressing had me cleaning out the bowl.

The contrasting texture of tortilla chips added crunch, and an avocado, freshness.

Note to vegetarians: you could easily ditch the chicken and add chickpeas or black beans!

Ingredients:

1 head iceberg (I used romaine because it was all I had at the time)
4 tomatoes, seeded and diced
1 avocado
1 roasted deli chicken breast meat shredded (I used sliced ham because I didn't have chicken)
3/4 c shredded cheddar or Monterey Jack cheese (Why is Monterey Jack capitalized?)

Salad Dressing:
1/2 c sour cream
1/2 c salsa
1/4 c mayonnaise
1/2 c canned chopped green chilies
1 lime, juiced
1 Tbsp sugar
1/2 tsp cumin
1/4 tsp chili powder

2 c crumbled tortilla chips, for topping

Directions:

1. Place lettuce, tomatoes, avocado, chicken, and grated cheese in a large bowl. (Or put into serving bowls. I did this so that everyone got equal toppings. Optional)

2. For the dressing, in a medium bowl, whisk sour cream, salsa, mayo, chopped green chilies, lime juice, sugar, cumin, and chili powder.

3. Add dressing to salad bowl tossing well to coat. Sprinkle salad with crumbled tortilla chips.

Serves 4

June 11, 2010

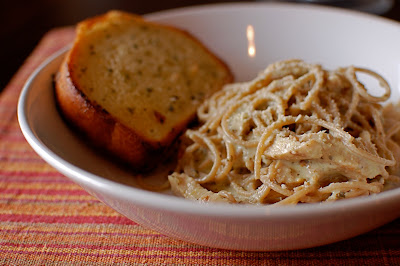
Chicken Pesto Pasta

Many of you know that pasta is one of my favourite things to make! I think it is because there are unlimited ways to make it, and most of the time my attempts are fairly successful. Oh, and it's deeeeeeeelicious. Ahem.

I've tried pasta carbonara (you'll see this post soon), rose sauces, creamy alfredo, meatless vegetarian concoctions, oil and spice, meatballs...and the list goes on!

I took a chance tonight on a chicken pesto pasta sauce. I say chance because I haven't made one before and I wasn't using a recipe. But how hard can it be? Right?

Chicken, milk, pesto, parmesan cheese...these are all familiar ingredients.


In the end it turned out quite nicely! Familiar ingredients, which I always like, and no time at all. Serve yours with toasted garlic bread. Mmmmm....

Ingredients:

1/2 (16 ounce) package spaghetti/linguine pasta
1 Tbsp canola oil
1/2 small onion, chopped
4 cloves garlic, sliced
1/4 c butter
1 Tbsp all-purpose flour
1 c milk
1/2 punch salt
1/2 pinch pepper
3/4 c grated parmesan cheese
1/2 c basil pesto
chicken, sliced and cooked (about 3oz person)

Directions:

1. Bring a large pot of salted water to a boil. Add pasta and cook for 8-10 minutes or until el dante; drain.

2. Heat canola oil in a large sauce pan over medium heat. Sautee onions until tender. Stir in garlic and butter, and sauté until garlic is soft and fragrant, about 1 minute. Disolve flour in milk and then stir in. Season with salt and pepper and simmer for approx. 4 minutes, stirring constantly. Add cheese and stir until melted. Stir in pesto.

3. Add cooked chicken (I used precooked, frozen, and reheated) and pasta to sauce, and serve.

May 7, 2010

Sweet and Savory Tomato Pie

This dish is one of my summer-time favourites!

It combines the sweet and tartness of beautiful vine-ripened tomatoes topped with green and fresh basil, salty cheese, a creamy dressing, all enclosed in a biscuit crust. To die for.

I first had this dish about 9 years ago (woah!) and I immediately fell in love. It is really yummy and it complements the tomato season perfectly! However don't let the name confuse you like it first did me. This dish isn't a pie like you would find in the desert section. And it doesn't get served as a desert. Tomato "pie" refers to it's combination of flavors, all in one dish.

By the way, there is a secret ingredient which makes this pie amazing. White (or red) current Jelly! It is served along side the pie as a kind of dip/sauce, and it's sweet flavor contrasted with the salty and savory pie makes it. This is not an optional ingredient if you want to have it right.

Give this dish a try on a warm saturday evening with a light salad and perhaps some berries for desert. Oh, and eat it outside if you can manage it!

Ingredients:

Biscuit Crust
2 c flour
1 stick butter
4 tsp baking pdr.
3/4 c milk

Filling
2 lbs tomatoes, fresh and sliced or canned (drained well)
a handful of chopped basil and chives
1 1/2 c sharp cheddar, grated

Sauce
1/3 c light mayo
2 Tbsp lemon juice
1/8 tsp pepper

Directions:

1. For the biscuit crust, mix ingredients by hand or in a food processor until well combined. Take half of the dough and roll out onto a floured work surface. Place into a 9" pie plate.

2. Add half of the tomatoes over the crust and scatter the chopped basil and scallions.
Top with 1 cup of sharp cheddar and the mayo sauce which has been thinned with lemon juice. Top this with the rest of the tomatoes and then cheddar.

3. Roll out the remaining dough and place over filling, pinching the edges to seal. Cut several steam vents in the top, and brush with an egg wash.

4. Cook at 400 for 25 minutes.

You can prepare this dish ahead of time and re-heat it before serving if you wish.

March 6, 2010

Gluten Free Pizza with Pizazz!


So I’ve had a craving for pizza for like... .two weeks. So I finally bit the bullet and made what I thought would be a really complicated recipe, but it turned out to be super simple AND I had most of the ingredients I needed!


The secret to this delicious delicacy is the crust. Its not ORDINARY pizza crust.... because its much MUCH better! Its a two cheese baked rice crust and it is ynummy!

So, y’all ready for this amazing pizza that might turn YOU off of gluten too?

As the Iron Chef says... ALLEEEEEEE CUISINE!


What You’ll Need:

Crust

¾ cup Uncooked Brown Rice or 1 ½ cups Cooked Brown Rice

¼ cup Mozzarella Cheese

1 Tbsp Parmesan Cheese

1 Egg White

Toppings

¼ cup Tomato Sauce

¼ cup Red Pepper

¼ cup Zucchini

2 Tbsp Red Onion

2 oz Pepperoni

¼ cup Mozzarella Cheese

Pinch of Oregano, Salt and Pepper.

1 Tsp Olive Oil

Crust

1. Cook ¾ cup rice and preheat oven to 350 degrees.

2. Grate ¼ cup of Mozzerella cheese, and mix with 1 tablespoon of parmesan cheese. Add 1 ½ cups of cooked brown rice, and egg white. Mix well.

3. On a greased baking sheet, mound the rice-cheese mixture and spread out evenly and gently with your fingers. The crust will be about ½ inch thick and will make an 8 inch circle.

4. Bake for 20 minutes.

Toppings

1. Chop Red pepper, zucchini, and red onion.

2. Sautee with 1 tsp of Olive Oil until tender. Add Oregano, salt and pepper.

3. Spread tomato sauce and sautéed vegetables on top of the baked crust, and add pepperoni and cheese.

4. Bake in a 350 degree oven for 15 minutes until cheese is melted.

5. Enjoy with a glass of red wine!


See? That wasn’t so hard! And I promise you won’t even miss the gluten with the scrumdidilyumptious crust!

December 8, 2009

Is that an Egg on your Pizza?


Wait. Lemme Check.


Oh why yes! Yes it is.

The short and quick version of why that is so, is basically, I had no other protein source in my fridge and I thought, why not!?

Jamie does it!


And I trust his opinion on things edible.

This pizza can be a really quick and satisfying snack, or turn it into a meal by serving it with some chips (fries. I'm speaking Jamie. ok. he's british. get it? okay good.) The crust is a whole wheat pita, so it couldn't be any easier. I also love using nan bread if you have any of that around the house. Top this with your home made tomato sauce, veggies, cheese, and crack an egg over the top. I drizzled some bbq sauce on top and threw some nice herbs de Provence on too, for good measure.

When it's done right, it's really quite good!

Ingredients:

1 whole wheat pita or nan
1/2 c grated cheddar cheese (approx.)
enough tomato sauce to cover your pita
diced veggies (your preference)
a pinch of herbs de Provence
a drizzle of bbq sauce (optional)
1 free range egg

Directions:

1. Preheat oven to 350 degrees.

2. Spoon sauce overtop of the pita and top with veggies and cheese.

3. Crack an egg overtop of your pizza. Don't worry that you can't see much of it, and if it drains down the sides. If the yolk breaks, it will cook faster.

3. Allow to cook on a low rack in the oven for about 20 minutes. Then, turn the oven onto the broiler setting and cook for about 5-7 more minutes. (If you jiggle the pan a bit you will be able to see if the egg is cooked. You don't want runny egg whites!)

Photo of Jamie courtesy of: http://static.guim.co.uk/sys
images/Guardian/Pix/pictures/2009/9/1/1251821546102/
Jamie-Oliver-in-America-002.jpg

September 28, 2009

A Breakfast Wrap

Do I like breakfast??

Ptcchyaaaa! (Translation: Yes, in fact I do!)

And I have discovered, (Well, Not Christopher Columbus or Alexander Fleming discovered, more like "woah, I just discovered that if I put the toaster on level 8, it burns the bread, kinda discovered.) the breakfast wrap.


And I'm kinda thrilled about it.

You can literally put anything into it, combined with eggs (or not!) and you have an instant, hold you till lunch, breakfast.

For my wrap, I like the combination of spicy jalapino peppers, two good quality free-range eggs, and parsley, all scrambled together, topped with cheese, and salsa, wrapped in a spinach tortilla. If I'm feeling quite hungry I would add some cooked sausage or perhaps a few strips of bacon or ham.

I'm thinking the next combination I try will have maple syrup in it somewhere. Perhaps I will fry some sausage in maple syrup and top the eggs with that, diced apples, and cheese. Yep. There's tomorrow's breakfast!

Place your desired toppings into the centre of the tortilla and then wrap it up*, enclosing the filling completely. When it is sealed I like to pop it onto the George Foreman Grill (or pannini press) for a few minutes. The grill takes even stale bread and gives it a really nice crunch and toasty-ness. Plus with the addition of heat, it combines the flavors inside the wrap nicely.

So give er a go, and see if you don't stay full for at least twice as long as usual. (Stay full longer by using a whole-grain tortilla, at least two eggs, and eating a piece of fruit on the side.)

*For proper wrapping techniques, you could check out this website, but I would recommend this one.

For a full rundown on the benefits of breakfast, you can check out this post.

Photo courtesy of http://www.portcityjava.com/images/secondaries/menu_graphics/b_wrap2.jpg

July 18, 2009

Serious Tuna Melts

There is nothing like these tuna melts if you enjoy the classic. They take the basic concept of tuna, cheese, and bread shoved under a broiler, and make it classy enough to have at a dinner party. (Make small bite size versions of your favourite version and serve it along side other hor dourves and white wine).


The idea to deck these little babies out to the max came from my desire to get as many vegetables into my food as possible. (Not to mention as much flavor as possible). I had some bright red vine tomatoes on my counter top and the herbs outside just had to be paired with them. Plus I put a bit of corn in with the tuna, adding just a touch of crunch and sweetness.

I was really inspired by all of the things sitting around the kitchen, and played with matching flavors.

The result was three slightly different variations (in flavor- but mainly presentation), all with the same basic tuna salad base (mayo, tuna, corn (the frozen variety is fine), salt and pepper:
  1. Rye bread, tuna with corn, tomatoes, basil, processed cheese, bacon, and chives:
  2. Rye bread, tuna with corn, tomatoes, real cheddar, bacon, basil:
  3. Rye bread, tuna with corn, tomatoes, basil, processed cheese, chives (chopped finely this time):

June 27, 2009

It's Not Delivery, It's Kraft

This is an ode to Kraft Pizza Kits.

Oh Kraft Pizza Kits, how simple you are.
The basics are covered,
every thing thought of ahead of time!
Parmesan cheese, oregano, sauce,
it is ALL there- ready for the cooking.
You have created a palate for me to work with,
a canvas to create art work on.
My art has become so delicious Kraft Pizza Kits,
and I can thank you for....


okay. okay. I just couldn't think of any other way to introduce a recipe that I didn't make from scratch at all. But I declare that Kraft Pizza Kits are undiscovered treasures, awaiting our creativity. What a fun way to create dinner with the kids; allowing them to pick their own toppings. Plus it really easy whip up if you don't have a lot of time/energy.

If you haven't given them a go before, please do. My family could make a pizza from scratch, but with this mix we always find excuses not to. For example, "it is too quick!" and "the sauce on this one tastes way better." So why mess with a good thing?

For a little inspiration, here is the pizza I made:


It plays host to:
  • chopped ham
  • green and red peppers
  • baby spinach
  • tomatoes
  • oregano
  • parm cheese
  • tex mex cheese

June 22, 2009

Pasta Rose with Zucchini, Corn, Green Peppers and Ham

Pasta is great because it creates a palate for all of those leftover veggies and meats you have lying around in your fridge. (Not to suggest that I ignore my veggies and sometimes overstock meats! No sir, not I).

I had a packaged Knorr Parma-Rosa sauce sitting around as well, and bam-shabam, lunch was served!

And what a satisfying meal it was! The combination of the sweet corn with the salty ham and savory sauce was really nice, and the green peppers were a natural fit. The zucchini gave just a subtle crunch with not an overwhelming flavor. Seriously I couln't have made a better combination if I had planned it! (It really was, 'a little of this, a little of that' in the pan).


Vegetarians
, a note to you: sub the ham for veg. ham or chicken and you have a great vegetarian lunch.

Be brave when you are making pasta! There is sooooo many things you can add to a basic tomato sauce, or a not so basic Parma-Rosa sauce (which is just a parmesean tomato sauce).


Keep in mind, any type of sauce will work. If you don't have a Knorr sauce mix or prefer a plain tomato one, that will be just as yummy. You have your own creative license over your pasta. If I was out of sauce mix, I would probably suggest an Alfredo sauce or blush sauce (tomato and Alfredo sauce combined).


Ingredients:

1 serving dry pasta ( I used vegetable fussili)
1 package Knorr Parma-Rosa sauce mix (+ 1/2 Tbsp. butter and 1 1/2 c. milk)
1/3 c. green zucchini, chopped into bite size pieces
1/4 c. frozen corn
1/4 c. green peppers, chopped
2 slices deli ham, sliced
parmesean cheese

Directions:

1. Put water on to boil for the pasta. Meanwhile begin pasta sauce and cook as directed on the package. Boil pasta according to package directions.

2. In a sautee pan, simmer one serving of sauce, zucchini, frozen corn, green peppers, and ham for about five minutes. Put cooked pasta and some parmesean cheese into the pan, combine, and serve. Top with additional parmesean cheese.

June 21, 2009

Pasta Ponza

This dish has quickly become one of my favourites!

It was inspired by Giada de Laurentis, the chef on Food Network's, "Everyday Italian." First, don't you think she is one of the friendliest chefs, ever?! I often feel more cheery after watching her show because she is always smiling, and finds so much joy in cooking for others. (Her and I have that in common!) Check out her website with Food Network here.

As for today's recipe, it came as a complete shock to me, how simple yet satisfying it was. The sweetness of the heirloom tomatoes, in combination with salty Parmesan and savory breadcrumbs, create a healthy, vegetarian option for your next dinner party. And seriously, you couldn't make this dish any easier if you tried.

Indeed, Italians are masters at transforming simple, everyday ingredients into dishes that are quick, healthy and satisfying.


When you are searching for tomatoes, the shot above shows the ones that I always go for; they are sweet heirloom tomatoes. An heirloom vegetable is a cultivar that was commonly grown during earlier periods in human history, but which is not used in modern large-scale agriculture. A true heirloom is a cultivar that has been nurtured, selected, and handed down from one family member to another for many generations. One box (which can be found at any grocery store that carries the President's Choice brand), is enough to feed about 3 people.


When I go back to school in the fall I know that this recipe will be a weekly go-to. The ingredients are on hand most of the time, and it only costs about $2.50 per portion. How awesome is that!?

I hope you enjoy it as much as I do! And as the Italians would say, Buon appetito!

Ingredients:

1 box sweet heirloom tomatoes
salt and pepper*
basil leaves*
olive oil*
onion flakes*
seasoned bread crumbs*
parmesan cheese*
seasoned breadcrumbs*
3 servings of dry spagetti
a handful of chopped parsley (optional)

*Amounts will be very rough, as it seems to always be with Italian cooking! A simple shake/drizzle over the tomatoes of each will be adequate.

Directions:

1. Preheat oven to 375 degrees (or 350 for a convection oven). In a medium size, baking dish (pictured right), rub the sides with butter to prevent sticking.

2. Chop tomatoes into halves and quarters and place into the baking dish. Cover (as shown right), with a few pinches of salt and pepper, a good drizzle of olive oil, a light shake of onion and basil flakes, a thicker layer of breadcrumbs, and finally, another drizzle of olive oil. Bake for 30 minutes.

3. Meanwhile, cook pasta according to package directions. When the tomatoes have cooked, pour over pasta and sprinkle with Parmesan cheese.